

Lung and Thoracic Cavity
Updated:
MAR 28, 2022
Languages:
Read
Thoracic Approaches
Dianne Dunning
Introduction
Intercostal thoracotomy and median sternotomy are the most commonly used thoracic approaches in small animals. The choice of a thoracic approach depends upon the type of access to the thoracic cavity that is needed. Intercostal thoracotomy is easy to perform and does not require special surgical instrumentation, but it permits only limited access within the thoracic cavity. Median sternotomy allows wide access to the thoracic cavity, except for the structures in the dorsal mediastinum such as the esophagus and bronchial hilus. However, median sternotomy requires access to an oscillating saw or sternal splitter. Nevertheless, median sternotomy is the thoracic approach that allows the most complete exploration of the thoracic cavity.
Surgical Technique
Intercostal Thoracotomy
Intercostal thoracotomy is chosen to provide access to a defined area of interest within one hemisphere of the thoracic cavity. Approximately one-third of one hemisphere of the thoracic cavity and its associated mediastinal structures are visible with this approach. The intercostal space chosen depends on the thoracic structures of interest (Table 27-1). In general, the cardiac structures are approached best through the fourth or fifth intercostal space. The cranial lung lobes are accessed through the fourth or fifth intercostal space, whereas the caudal lung lobes are best accessed through the fifth or sixth intercostal space. The right middle lung lobe is accessed through the right fifth intercostal space. The cranial esophagus can be accessed from either the third or the fourth intercostal space on the right or left side. The caudal esophagus is accessed on either the right or left side between the seventh and eighth intercostal space. The thoracic duct in the dog is best accessed between the eighth and tenth spaces. These are general guidelines only, as thoracic radiographs or CT should be reviewed prior to any surgical procedure to identify the most appropriate intercostal space for entry to the thoracic cavity. In addition, up to three ribs may be partially excised to improve access to the thoracic hemisphere without destabilizing the thoracic wall and compromising chest wall excursion.
To perform an intercostal thoracotomy, the patient is placed in lateral recumbency with a rolled pad placed under the thorax. An incision is made with a scalpel through the skin, subcutaneous tissues, and cutaneous trunci muscle. The latissimus dorsi and pectoralis muscles are incised parallel to the skin incision. The fifth rib is easily identified as the caudal insertion of the scalenus muscle and the cranial origin of the external abdominal oblique muscle (Figure 27-1). Depending on the intercostal space entered, either the scalenus or the external abdominal oblique muscle is incised. The serratus ventralis muscle is separated to expose the desired intercostal space (Figure 27-2). The intercostal muscles are incised midway between the ribs to avoid lacerating the intercostal vessels, coursing on the caudal aspect of each rib (Figure 27-3). The pleura is punctured, and the incision is extended with scissors dorsally to the tubercle of the rib and ventrally past the costochondral arch to the internal thoracic vessels. A Finochietto retractor is used to expose the thoracic structures and a thoracic exploratory is performed prior to any surgical intervention.

Figure 27-1. Intercostal thoracotomy. Incision of the latissimus dorsi muscle. The fifth rib is identified by the caudal insertion of the scalenus muscle and the cranial origin of the external abdominal oblique muscle. (From Orton EC. Small animal thoracic surgery. Baltimore: Williams & Wilkins, 1995:57.)
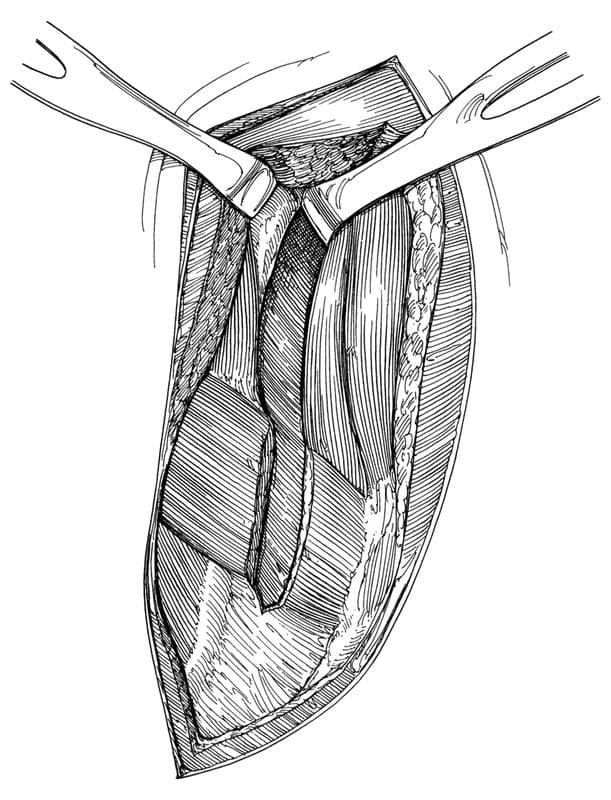
Figure 27-2. Intercostal thoracotomy. Incision of the scalenus muscle and the serratus ventralis muscle. (From Orton EC. Small animal thoracic surgery. Baltimore: Williams & Wilkins, 1995:57.)

Figure 27-3. Intercostal thoracotomy. Incision of the intercostal muscles midway between the ribs to avoid damaging the intercostal vessels. (From Orton EC. Small animal thoracic surgery. Baltimore: Williams & Wilkins, 1995:58.)
Prior to closure of the thoracotomy, a thoracostomy tube is placed through the caudodorsal thoracic wall (Figure 27-4). The thoracostomy tube should remain open to the atmosphere during closure of the thoracotomy site to prevent inadvertent tension pneumothorax. Once the soft tissues are apposed and the closure is airtight, the pleural space is evacuated, and the thoracostomy tube is closed. Before thoracotomy closure, a local selective intercostal nerve block of the adjacent intercostal spaces is performed with 0.75% bupivacaine to decrease postoperative pain and to improve ventilation.

Figure 27-4. Intercostal thoracotomy. Placement of a thoracostomy tube in the caudodorsal thorax before closure. (From Orton EC. Small animal thoracic surgery. Baltimore: Williams & Wilkins, 1995:60.)
The thoracotomy is closed by preplacing five to eight heavy-gauge sutures around the adjacent ribs. The preplaced circumcostal sutures are used by an assistant to approximate the ribs while the surgeon ties each suture (Figure 27-5A,B). Transcostal sutures that are placed through holes drilled in adjacent ribs has been suggested as a less painful method of closure. The serratus ventralis or external abdominal oblique and scalenus muscles are closed in a single layer with a simple continuous suture pattern. The latissimus dorsi muscle, cutaneus trunci muscle, subcutaneous tissues, and skin are closed in separate layers with a simple continuous suture pattern (Figure 27-6).

Figure 27-5A. Intercostal thoracotomy closure. Approximation of the ribs by an assistant using the preplaced circumcostal sutures while the surgeon ties each suture. (From Orton EC. Small animal thoracic surgery. Baltimore: Williams & Wilkins, 1995:60.)

Figure 27-5B. Schematic of transcostal suture placement. A 0.062 Steiman pin is used to drill the holes in the 5th rib. The suture is passed around the cranial aspect of the cranial rib and through the caudal rib and tied securely, thus avoiding the neurovascular bundle. (From Rooney MB, Mehl M, Monnet E. Intercostal thoracotomy closure: transcostal sutures as a less painful alternative to circumcostal suture placement. Vet Surg 2004;33:209-213.)
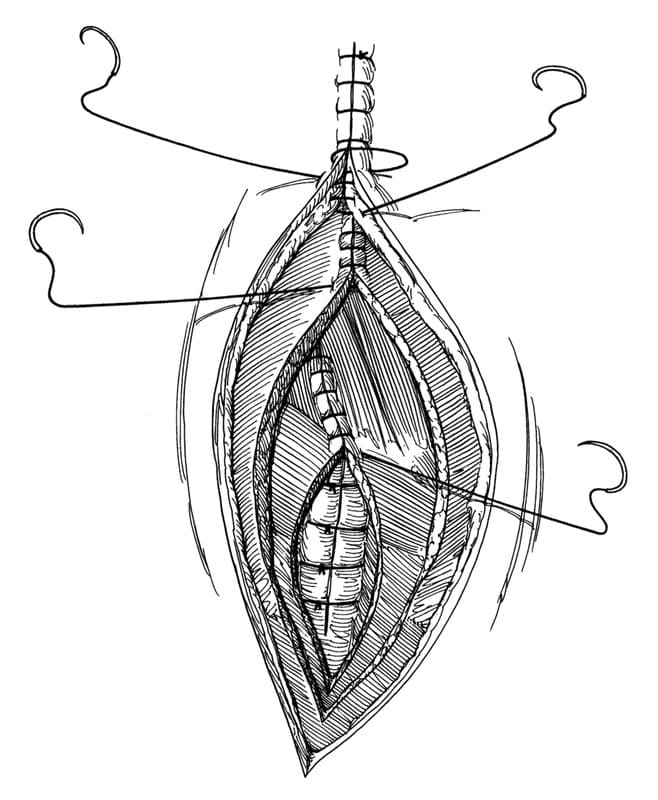
Figure 27-6. Intercostal thoracotomy closure. Closure of the muscle and skin in separate layers with a simple continuous suture pattern. (From Orton EC. Small animal thoracic surgery. Baltimore: Williams & Wilkins, 1995:62.)
Median Sternotomy
Median sternotomy is indicated when exploratory surgery of the thoracic cavity is necessary. Median sternotomy should not be avoided because of a belief that it is associated with higher postoperative pain and complication rates than intercostal thoracotomy. Complication rates associated with median sternotomy are no higher than those associated with thoracotomy.
Median sternotomy is performed with the animal in dorsal recumbency. The skin and subcutaneous tissues are incised with a scalpel over the midline on the sternum (Figure 27-7). The pectoral musculature is incised and is elevated from the sternebrae with electrocautery. The sternum is then cut on its midline with an oscillating saw or sternal splitter (Figure 27-8). Care is taken to limit the penetration of the saw or osteotome to avoid injury to internal thoracic structures. Either the manubrium or the xiphoid is left intact to achieve a stable closure of the sternum. Finochietto retractors are used to expose thoracic structures. A caudal median sternotomy can be combined with a ventral midline celiotomy to gain further exposure of caudal thoracic and cranial abdominal structures (Figure 27-9). A partial incision of the diaphragm can be made to facilitate wider retraction. A midline cervical incision can be combined with a sternotomy through the manubrium to expose the structures of the thoracic inlet.
Before closure, a thoracostomy tube is placed subcostally and lateral to the midline (Figure 27-10). The sternotomy is closed with alternating figure-of-eight 20 to 22gauge orthopedic wires (Figure 27-11). The pectoralis muscles, subcutaneous tissues, and skin are closed in separate layers with a simple continuous suture pattern.

Figure 27-7. Median sternotomy. Median sternotomy is performed with the animal in dorsal recumbency. (From Orton EC. Small animal thoracic surgery. Baltimore: Williams & Wilkins, 1995:65.)

Figure 27-8. Median sternotomy. The sternum is cut on midline with an oscillating saw. (From Orton EC. Small animal thoracic surgery. Baltimore: Williams & Wilkins, 1995:66.)

Figure 27-9. Median sternotomy. A caudal median sternotomy combined with a ventral midline celiotomy to gain exposure to the caudal thoracic and cranial abdominal organs. (From Orton EC. Small animal thoracic surgery. Baltimore: Williams & Wilkins, 1995:67.)

Figure 27-10. Median sternotomy. Placement of a thoracostomy tube paramedially and subcostally before closure. (From Orton EC. Small animal thoracic surgery. Baltimore: Williams & Wilkins, 1995:69.)

Figure 27-11. Median sternotomy closure. Stable closure of the sternotomy is achieved by preplaced alternating figure-of-eight orthopedic wire around each sternebra. The muscle, subcutaneous tissues, and skin are closed in separate layers in a simple continuous suture pattern. (From Orton EC. Small animal thoracic surgery. Baltimore: Williams & Wilkins, 1995:67.)
Postoperative Care
Hypoventilation, hypoxemia, hypothermia, acid-base imbalance, hypotension, pain and hemorrhage are among the problems that may arise in the first 12 to 24 hours after thoracotomy. Median sternotomy and intercostal thoracotomy are both associated with alterations in normal pulmonary function that may be attributed to several factors including pain. These changes may inhibit deep inspiration and may promote small airway collapse, resulting in ventilation-perfusion mismatch. Measurement of arterial blood gases after surgery provides information about ventilation and pulmonary gas exchange. Additional postoperative monitoring should include frequent assessment of drainage from the thoracic cavity, temperature, pulse rate, respiratory rate, and mucous membrane color.
Analgesia is indicated in all animals after thoracotomy. Parenteral opioids, epidural morphine, intrapleural anesthetics, and selective intercostal nerve blocks using 0.75% bupivacaine may be used alone or in combination to provide postoperative analgesia (Table 27-2).

Suggested Readings
Burton CA, White RN. Review of the technique and complications of median sternotomy in the dog and cat. J Small Anim Pract 1996;37:516-522.
Pelsue DH, Monnet E, Gaynor JS, et al. Closure of median sternotomy in dogs: suture versus wire. J Am Anim Hosp Assoc 2002;38:569-576.
Rooney MB, Mehl M, Monnet E. Intercostal thoracotomy closure: transcostal sutures as a less painful alternative to circumcostal suture placement. Vet Surg 2004;33:209-213.
Berg RJ, Orton EC. Pulmonary function in dogs after intercostal thoracotomy: comparison of morphine, oxymorphone, and selective intercostal nerve block. Am J Vet Res 1986;47:471-474.
Conzemius MG, Brockman DJ, King LG, et al. Analgesia in dogs after intercostal thoracotomy: a clinical trial comparing intravenous buprenorphine and interpleural bupivacaine. Vet Surg 1994;23:291-298.
Orton EC. Small animal thoracic surgery. Baltimore: Williams & Wilkins, 1995:33-40, 55-72.
Pascoe PJ, Dyson DH. Analgesia after lateral thoracotomy in dogs: epidural morphine vs. intercostal bupivacaine. Vet Surg 1993;22:141-147.
Stobie D, Caywood DD, Rozanski EA, et al. Evaluation of pulmonary function and analgesia in dogs after intercostal thoracotomy and use of morphine administered intramuscularly or intrapleurally and bupivacaine administered intrapleurally. Am J Vet Res 1995;56:1098-1109.
Thompson SE, Johnson JM. Analgesia in dogs after intercostal thoracotomy: a comparison of morphine, selective intercostal nerve block, and interpleural regional analgesia with bupivacaine. Vet Surg 1991;20:73-77.
Walsh PJ, Remedios AM, Ferguson JF, et al. Thoracoscopic versus open partial pericardectomy in dogs: comparison of postoperative pain and morbidity. Vet Surg 1999;28:472-479.
Pulmonary Surgical Techniques
Dianne Dunningors
Partial and complete lung lobectomies are occasionally indicated in small animal practice. Although the surgical techniques are not difficult, they require a familiarity with thoracic anatomy and pulmonary physiology, as well as a support staff to monitor the animal both during and after surgery to ensure a successful outcome.
Surgical Anatomy
The trachea of dogs and cats divides into two principal bronchi, which in turn subdivide into lobar bronchi that supply each lung lobe (Figure 27-12). The left and right lungs are separated by a thin but complete mediastinum. The left lung is divided into cranial and caudal lobes by a deep fissure. The left cranial lung lobe is further divided by an incomplete fissure into cranial and caudal parts, but they share a common lobar bronchus. The right lung is divided into cranial, middle, caudal, and accessory lobes. The accessory lobe passes dorsal to the caudal vena cava and lies medial to the plica vena cava, a fold of pleura that extends around the caudal vena cava. These structures should be identified during manipulation of the right caudal and accessory lung lobes. The pulmonary vessels closely follow the lobar distribution of the bronchi. Pulmonary arteries are located on the craniodorsal aspect of each bronchi, whereas pulmonary veins are located on the caudoventral aspect. Partial or complete lung lobectomy may be performed through a standard intercostal thoracotomy in the fourth through sixth intercostal space or through a median sternotomy.

Figure 27-12. Lung lobe anatomy. A. Left. B. Right. (From Orton EC. Small animal thoracic surgery. Baltimore: Williams & Wilkins, 1995:162.)
Surgical Techniques
Partial Lung Lobectomy
Partial lung lobectomy is used to obtain a biopsy or excise localized marginal lesions of the distal two thirds of the lung. Partial lung lobectomy may be performed by freehand suturing or with a stapling device. To perform a partial lobectomy by hand, the lung is clamped with noncrushing vascular or intestinal clamps proximal to the isolated lesion (Figure 27-13). The lung is excised distal to the clamps. A continuous horizontal mattress pattern of 4-0 monofilament suture is placed proximal to the clamps (Figure 27-14). Delicate swaged-on taper-point needles should be used. Smooth fluid movements that follow the curvature of the needle should be used when driving the needle through the tissue to minimize air leaks at the suture line. The ends of the suture are tied and “tagged” with hemostatic forceps to facilitate manipulation of the lung. The clamps are removed, and the lung incision is oversewn in a simple continuous pattern (Figure 27-15). The incision is then checked for air leaks by submerging the lung in saline during positive-pressure ventilation of 20 to 30 cm of H2O. Additional sutures may be placed as necessary. Some leakage of air after this technique may be expected, but this usually resolves within a few hours after surgery.
Stapling devices are now commonly available to veterinary surgeons. The advantages of stapling equipment for partial lobectomy are shortened surgical and anesthetic time, decreased blood loss, and reduction of the incidence of bronchopleural fistulas after lung lobe resection. The most useful device for pulmonary procedures is the thoracoabdominal (TA) stapler. This instrument places two staggered rows of stainless steel staples that form a B shape when compressed. The 3.5 mm (blue) or the 2.5 mm (white, V or V3) staple cartridges may be used for pulmonary procedures. A gastrointestinal anastomosis stapler also may be used for longer staple lines. The stapler is placed across the lung and is clamped proximal to the lesion (Figure 27-16). The staple device is fired and the lung is transected utilizing the edge of the TA stapling device as a cutting edge. After the removal of the stapling device, the lung is checked for air leaks in the manner described previously.

Figure 27-13. Partial lung lobectomy. The lung is clamped proximal to the isolated lesion. (From Orton EC. Small animal thoracic surgery. Baltimore: Williams & Wilkins, 1995:165.)

Figure 27-14. Partial lung lobectomy. A continuous horizontal mattress pattern is placed proximal to the clamps. (From Orton EC. Small animal thoracic surgery. Baltimore: Williams & Wilkins, 1995:165.)
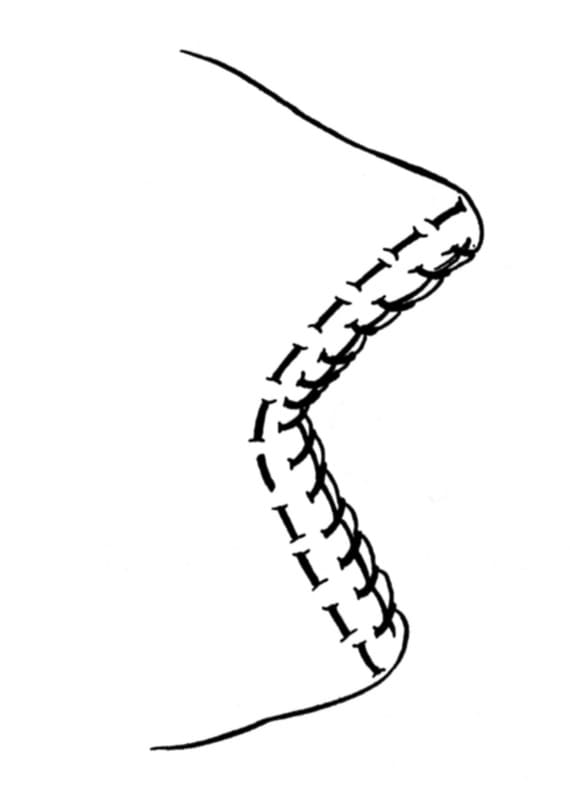
Figure 27-15. Partial lung lobectomy. The clamps are removed, and the incision is oversewn with a simple continuous pattern. (From Orton EC. Small animal thoracic surgery. Baltimore: Williams & Wilkins, 1995:165.)

Figure 27-16. Partial lung lobectomy with staples. The stapler is placed across the lung and is clamped proximal to the lesion. (From Orton EC. Small animal thoracic surgery. Baltimore: Williams & Wilkins, 1995:166.)
Complete Lung Lobectomy
Excision of an entire lung lobe is indicated for severe trauma, neoplasia, lobe torsion, abscesses, or refractory infections. The affected lung lobes should be manipulated gently to minimize embolization of neoplastic cells or extrusion of purulent material into adjacent airways. Dogs and cats can survive removal of up to 50% of lung lobe mass. Removal of more than 75% of the lung is invariably fatal. Because the right lung constitutes more than 50% of the lung capacity, removal of the entire right lung is contraindicated. Excision of the entire left lung is tolerated in the dog, assuming the right lung is normal.
Lung lobectomy should follow the anatomic distribution of the bronchi. The left cranial and caudal lung lobes may be removed individually. The cranial, middle, and caudal right lobes may be removed individually because they each have separate bronchi. The accessory lung lobe usually is removed with the left caudal lung lobe. Before removal of the caudal and accessory lobes, the pulmonary ligaments must be divided from the mediastinum with Metzenbaum scissors.
The pulmonary artery is accessed first by ventral and caudal retraction of the lung lobe. The lobe may be grasped gently with a dry gauze sponge. The artery is isolated by blunt dissection with right-angle forceps parallel to the long axis of the vessel (Figure 27-17). The artery is triple ligated and is divided between the middle and distal ligature. The pulmonary vein is accessed by dorsal and cranial retraction of the lung lobe. The vein is isolated, ligated, and divided in a similar manner to the artery. The lobar bronchus is then clamped with a noncrushing tangential clamp and is divided 3 mm distal to the clamp. The bronchial stump is closed with 4-0 suture in a continuous mattress pattern (Figure 27-18). The tangential clamp is removed, and the bronchial stump is oversewn with a continuous pattern (Figure 27-19). The bronchus is then checked for air leaks by saline immersion.
En bloc stapling of the hilus may be used to remove large lung lobe abscesses or tumors when minimal handling of the affected lung is desired. When using 2.5-mm staples (TA 30 V or V3, white), it is rarely necessary to separately ligate and divide the pulmonary vessels. Dissection of the lung lobe from the mediastinum is performed if needed to exteriorize the lobe. The stapler is placed across the hilus of the lobe and is clamped. A clamp is placed distal to the TA stapler across the lobe to prevent spillage of material from the lobe. The staple device is fired, and the lobe is transected, using the edge of the TA stapling device as a cutting edge. After the removal of the stapling device, the hilus is inspected for leaks in the same manner as described previously.

Figure 27-17. Complete lung lobectomy. Dissection of the ligatures around the pulmonary vessels is accomplished with right-angle forceps parallel to the long axis of the vessel. (From Orton EC. Small animal thoracic surgery. Baltimore: Williams & Wilkins, 1995:164.)

Figure 27-18. Complete lung lobectomy. The lobar bronchus is clamped and divided, and the bronchial stump is closed in a continuous mattress pattern. (From Orton EC. Small animal thoracic surgery. Baltimore: Williams & Wilkins, 1995:164.)
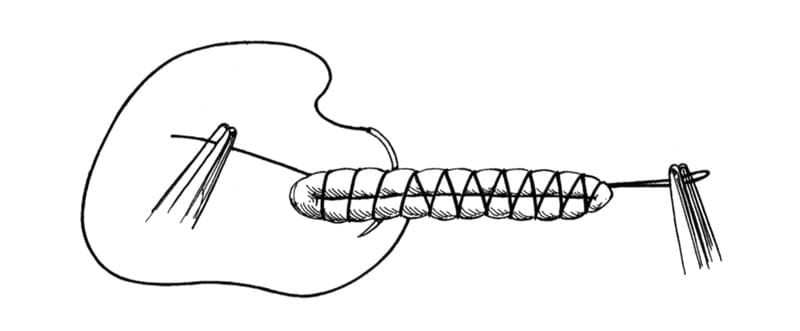
Figure 27-19. Complete lung lobectomy. The bronchial stump is oversewn with a continuous pattern. (From Orton EC. Small animal thoracic surgery. Baltimore: Williams & Wilkins, 1995:164.)
Postoperative Care
Placement of a thoracostomy tube is always recommended before closure of the thoracotomy. If the thoracostomy tube is nonproductive, it may be removed soon after the surgical procedure (see the earlier section of this chapter on thoracic approaches). Animals should be monitored frequently for pneumothorax or hemorrhage after pulmonary surgery. Pneumothorax usually resolves spontaneously after pulmonary surgery. High-volume air leaks can be managed by continuous suction until they resolve.
Suggested Readings
Garcia F, Prandi D, Pena T, et al. Examination of the thoracic cavity and lung lobectomy by means of thoracoscopy in dogs. Can Vet J 1998;39:285-291.
Lansdowne JL, Monnet E, Twedt DC, et al. Thoracoscopic lung lobectomy for treatment of lung tumors in dogs. Vet Surg 2005;34:530-535.
Lipscomb VJ, Hardie RJ, Dubielzig RR. Spontaneous pneumothorax caused by pulmonary blebs and bullae in 12 dogs. J Am Anim Hosp Assoc 2003;39:435-445.
McNiel EA, Ogilvie GK, Powers BE, et al. Evaluation of prognostic factors for dogs with primary lung tumors: 67 cases (1985-1992). J Am Vet Med Assoc 1997;211:1422-1427.
Murphy ST, Ellison GW, McKiernan BC, et al. Pulmonary lobectomy in the management of pneumonia in dogs: 59 cases (1972-1994). J Am Vet Med Assoc 1997;210:235-239.
Orton EC. Small animal thoracic surgery Baltimore: Williams & Wilkins, 1995:161-167. Walshaw R. Stapling techniques in pulmonary surgery. Vet Clin North Am Small Anim Pract 1994;24:335-366.
Thoracic Drainage
Dennis T. Crowe and Jennifer J. Devey
The ability to recognize and manage the dog or cat with various types of fluid (blood, chylous effusion, suppurative effusion, transudate) or air accumulation in the pleural cavity is vital. Although small accumulations of fluid or air in the pleural space may be easily tolerated and hence go undetected, larger amounts prevent normal lung expansion during the inspiratory phase of the ventilatory cycle and can cause a significant increase in ventilatory effort. If significant air or fluid accumulations are present, the animal may display signs of respiratory distress, orthopnea, polypnea, and poor tolerance for exercise or stress. Immediate thoracentesis of fluid or air can be accomplished with a minimal stress to the patient and may provide enough drainage to be lifesaving. Although mild conditions may require treatment only by thoracentesis, more severe conditions require the placement of a chest tube (tube thoracostomy) and either intermittent or continuous pleural evacuation. If suppurative or infected fluids are retained in the pleural space, the patient is at an increased risk of systemic infection or sepsis. Retention of chylous effusions can lead to fibrosing pleuritis and atelectasis. This discussion reviews the common methods of pleural drainage used in small animal practice.
Needle Thoracentesis
Procedure
If the patient has any evidence of respiratory distress, oxygen should be provided immediately. This can be administered by flow-by oxygen at high flow rates (10 to 15 L/minute), oxygen mask, human nasal cannulas, nasal oxygen tubes, or oxygen hoods. Oxygen cages are not recommended because of the inability to monitor and treat the patient (See Chapter 6).
Before performing needle thoracentesis in the conscious and aware patient, a local anesthetic block is recommended. Using a 22- to 25-gauge needle 1% lidocaine is infiltrated into all layers from the skin down to and including the pleura, with a small amount of anesthetic deposited into the pleural space. The lidocaine should be buffered with sodium bicarbonate. A suggested ratio is two-thirds 1% lidocaine to one-third sodium bicarbonate. Systemic analgesia is not generally required for needle thoracentesis; however, when the patient is in pain, parenteral analgesics may also be used.
Emergency and diagnostic needle thoracentesis can be performed with various needles and catheters, including an 18- to 20-gauge hypodermic needle, a short plastic intravenous catheter, or a bovine teat cannula (Figure 27-20). In extremely small patients, an 18- to 20-gauge butterfly catheter can also be used. A three-way stopcock and a 35- or 60-mL syringe are attached to the needle either directly or by a 20-inch section of intravenous extension tubing. The intravenous tubing, three-way stopcock, syringe should be assembled and capped to maintain sterility and stored in a crash cart for emergencies. A second section of tubing, attached to the sidearm of the stopcock, is useful in directing aspirated fluids into a collection jar. This assembled apparatus can be operated by one person.

Figure 27-20. Apparatus for thoracentesis: an indwelling intravenous catheter or a bovine teat cannula, a three-way stopcock, a large syringe, and tubing from an intravenous administration set. Plastic catheters and blunt teat cannulas can remain perpendicular to the chest wall because of the low likelihood of causing lung injury. (From Bojrab MJ, ed. Current techniques in small animal surgery. 2nd ed. Philadelphia: Lea & Febiger, 1983.)
Thoracentesis is usually performed at the seventh or eighth intercostal space (Figure 27-21). The animal should be allowed to rest in the position providing the least stress. Usually, this is standing, sitting, or in sternal recumbency. The lateral recumbent position is only acceptable if the patient is unconscious, intubated, and being ventilated. The dorsoventral location of the puncture site within the intercostal space is influenced by whether air or fluid is to be aspirated. If air is to be aspirated, the midthoracic region is preferred, with the animal in lateral recumbency. If the animal is standing or is in sternal recumbency, air is aspirated at the junction of the dorsal and middle thirds. Fluid is best removed from the middle third of the seventh intercostal space, when the animal is standing or is in sternal recumbency. More caudal placement of a needle may lead to penetration of the dome of the diaphragm and or liver injury.
Inadvertent injury to the lung parenchyma with the tip of the needle may lead to pneumothorax, particularly if the lung is lacerated in the process. This complication can be avoided by the use of the following technique: An 18- or 20-gauge needle is placed through the skin with the bevel facing caudally. A drop of saline is placed on the needle hub, and the needle is then slowly advanced into the pleural space (Figure 27-22A). Once the pleural space is entered, the negative pressure within the thorax causes the fluid in the hub to be pulled into the chest. In cases of tension pneumothorax, the pressure causes the fluid to be pushed out of the needle hub (Figure 27-22B). The surgeon must stop advancing the needle at this point, to avoid lung injury. The needle is then tilted in a caudal direction. At this time, the bevel of the needle should be directed parallel to the chest wall, with the opening directed away from the chest wall (Figure 27-22C).
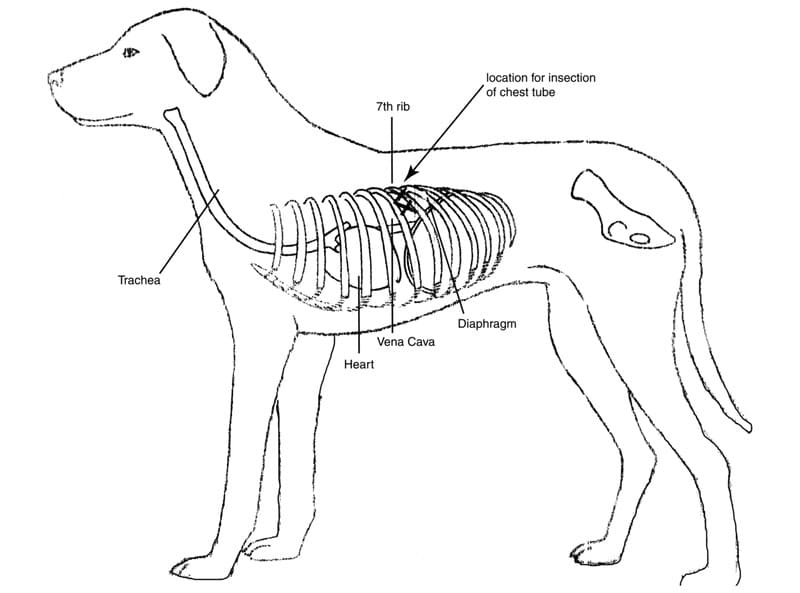
Figure 27-21. The seventh intercostal space is the ideal location for thoracentesis and chest tube insertion in most patients because of safety. Here at the junction of the dorsal third and ventral third of the space is the least danger of causing injury to vascular structures, the large airway, and the diaphragm.

Figure 27-22. A-C. A hypodermic needle is used to evacuate air or fluid from the pleural space. A drop of saline added to the hub of the needle is used to indicate when the tip of the needle is in the pleural space. The drop of fluid is aspirated into the pleural space if the fluid is still under negative pressure. If it is under positive pressure, the fluid moves outward; if it moves outward under force, a tension pneumothorax is present. The needle is then angled to allow the bevel of the needle to face the open pleural space and is held there while aspiration is performed. (The syringe depicted in the drawing is too small for the job.)
Indications
Thoracentesis used as a diagnostic procedure can provide a fluid sample for laboratory evaluation. Thoracentesis is ideal for the initial treatment of acute pneumothorax and pleural effusions and as a method of intermittent drainage of the pleural cavity for treatment of slow accumulations of fluid or air. The surgical placement of a chest drainage tube (tube thoracostomy), however, is preferred for the removal of large volumes of fluid or continuing accumulation of air in the pleural space. Clinical experience has also suggested that it is impossible to drain the pleural space adequately with simple thoracenteses when accumulations of blood, chylous effusion, or pus are present.
Complications
Inadvertent trauma to the lung from overpenetration and movement of the needle leading to lung laceration is the most common complication. This is best prevented using the foregoing technique. The intercostal vessels can be lacerated during the procedure if the needle is introduced immediately adjacent to the ribs. A minor laceration is likely to be self-limiting; however, if an expanding hematoma is noted over the thoracentesis site, this area should be surgically explored and the vessel ligated or cauterized. Rarely, tangential laceration of an intercostal artery can cause serious hemothorax.
Minithoracostomy
Indications and Tube Selection
Various commercial thoracentesis and minithoracostomy tube kits are available (Argyle Turkel Safety Thoracentesis System, Sherwood Medical Products, St. Louis, MO; Pneumothorax Sets, Cook Critical Care, Bloomington, IN). These kits contain a medium-bore multiholed catheter (8 to 10 French) for pleural drainage. These catheters can be used for temporary drainage and may be valuable for short-term indwelling chest tubes for cats and small dogs.
Procedure
If a minithoracostomy tube is selected for insertion, the lateral chest wall at the level of the seventh to ninth intercostal spaces is aseptically prepared. A local anesthetic block using 1 to 2% lidocaine is placed. On rare occasions, the animal may require minor sedation or short-acting neuroleptanalgesia. If sedation or neuroleptanalgesia is required, it should be provided intravenously to effect, and ventilation should be monitored. A small skin incision (large enough to allow passage of the thoracostomy tube) is made. The needle and catheter system are slowly introduced into the pleural space, and suction is applied. If an indwelling system is required, the catheter assembly is advanced, the needle assembly is removed, and the tube is secured. Some systems (Argyle Turkel Safety Thoracentesis System, Sherwood Medical Products) have color indicators to detect when the pleural space has been entered. After placement, the catheter is fixed in place by suturing the tube to the fascia, and a bandage is applied. A radiograph is taken to assess tube location.
Complications
The short length of these minithoracostomy catheters may lead to dislodgment, particularly in larger dogs (A Mann, unpublished data). The catheter may also be too small to achieve adequate pleural drainage in big dogs or in those animals with rapid reaccumulations of fluid or air. Kinking can also be a problem with these catheters.
Tube Thoracostomy
Tube Selection
Tube thoracostomy involves the surgical placement of flexible sterile red rubber (Sovereign, Sherwood Medical Products), polyvinyl chloride (Argyle Straight Thoracic Catheter, Sherwood Medical Products; Cook Critical Care), or silicone (Cook Critical Care) tube into the pleural space. Sterile endotracheal tubes can also be used if they are modified by knotting the cuff inflation mechanism, cutting the valve off, and removing the cuff. The tubing should be flexible, but not collapsible. The internal diameter of the tube should be at least one-half to two-thirds the width of one of the larger intercostal spaces (approximate diameter of a mainstem bronchus). This is important if tension pneumothorax is being treated and to help prevent occlusion by clots or viscous fluids.
The number and size of the holes placed in the catheter also influence the flow rate and effectiveness of the tube. Experimental flow studies on catheters indicate that, when three side holes are present, each additional hole increases the flow rate by only 6%. Most commercially available chest tubes contain an end hole and five or six side holes. If a noncommercial tube is used, side holes can be created using a pair of scissors or a No. 15 scalpel blade. The recommended size of the hole is approximately one-fourth the circumference of the tube. Diameters exceeding one-third the circumference of the tube cause considerable weakness and predispose the tube to kinking.
Commercially available chest tubes contain a marker strip throughout their length to allow radiographic confirmation of placement. The end of a chest tube should be placed on the ventral floor of the patient’s thorax and cranial to or adjacent to the heart. In this location, both air and fluid can be drained efficiently from the pleural cavity where the tube is located. All holes must be located within the chest cavity. This placement can be verified radiographically with tubes that have a “sentinel eye,” that is, an interruption in the radiopaque marker where the last hole is located. For best function, the tube should be placed no farther cranially than the level of the second rib; more cranial placement may obstruct the flow of air or fluid and may cause phrenic nerve irritation and dysfunction (Figure 27-23). In tubes where holes have been created, the last hole should be placed through the radiopaque marker for identification purposes. In some cases, because the mediastinum is intact, two chest tubes are required, one for each side of the pleural space.

Figure 27-23. Drawings from lateral A. and ventrodorsal B. radiographs demonstrate proper intrathoracic location of the chest drain. The arrowhead in A indicates the location of the last side hole in the catheter as seen on the radiograph (where the radiopaque line is interrupted). (For best function, the tube should be placed no farther cranially than the level of the second rib; more cranial placement may obstruct the flow of air or fluid.) (From Bojrab MJ, ed. Current techniques in small animal surgery. 2nd ed. Philadelphia: Lea & Febiger, 1983.)
Chest Tube Placement During Thoracotomy
To place a chest tube at the time of a thoracotomy, the tip of a curved hemostat is bluntly forced through intercostal muscle and parietal pleura at the seventh or eighth intercostal space or two spaces caudal to the thoracotomy incision. A subcutaneous tunnel is made in a caudal direction from the inside of the thorax to the outside for a distance of two to three intercostal spaces. A small skin incision is made at the ninth or tenth intercostal space over the tips of the hemostats. The proximal part of the chest tube is grasped, and the tube is pulled into the thoracic cavity and positioned. The tube can also be placed by advancing a curved hemostat through the incision into the pleural cavity, by grasping the distal part of the tube and pulling the tube out of the chest cavity in a reverse fashion (Figure 27-24). Cutting the distal part of the tube on an oblique angle creates a pointed end that facilitates its movement through the thoracic wall if it is placed in a reverse fashion. The tip of the tube is positioned cranial and ventral. In all cases, radiographs should be taken after the tube is placed to ensure that the tube is in a proper location and is not kinked or twisted (Figure 27-25).

Figure 27-24. In pulling the chest drain out through the seventh or eighth intercostal space, cutting the end of the tube on an oblique angle facilitates its movement through the thoracic wall. (From Bojrab MJ, ed. Current techniques in small animal surgery. 2nd ed. Philadelphia: Lea & Febiger, 1983.)

Figure 27-25. Line drawing of a lateral radiograph demonstrates improper placement and kinking of the chest drain. (From Bojrab MJ, ed. Current techniques in small animal surgery. 2nd ed. Philadelphia: Lea & Febiger, 1983.)
Anchoring the Chest Tube
The tube is secured by passing a heavy suture on a taper needle through the skin next to the tube and into the periosteum of the rib adjacent to the tube. A hinge is created by tying 6 to 10 knots and then the suture is passed around the tube in a simple criss-cross fashion and tied with 2 knots. This criss-cross “friction knot” is repeated 2 to 3 times, and then 3 to 5 more knots are tied (Figure 27-26). The use of this friction knot avoids the need for tape, which is not sterile and can slip. A second hinge is created on the other side of the tube with the same suture, and the suture is anchored again through the skin and into the periosteum. In small patients, the suture can be passed around the rib. If this is done, care is taken to ensure that the needle does not lacerate the lung. If the suture is not anchored to the periosteum, the tube may migrate as the patient breathes and moves, and the tip may exit the pleural space. The thoracotomy is then closed.

Figure 27-26. Securing the drain tube using a Chinese finger trap friction suture. First, the suture is tied without tension to prevent irritation of the skin (a); then, in a criss-cross fashion, multiple surgeon’s knots are tied around the tube (b), chest catheter (c), and gum-rubber tubing (d). Although the drawing depicts a finger trap, all that is really required are several “friction knots” tied in criss-cross fashion and wrapped around the tube (inset). (From Bojrab MJ, ed. Current techniques in small animal surgery. 2nd ed. Philadelphia: Lea & Febiger, 1983.)
Chest Tube Placement with the Chest Closed
A “closed” tube thoracostomy is performed outside the operating room with the patient in a sitting or standing position or whichever position causes the least distress to the animal. This factor is particularly important in patients showing any signs of respiratory distress. Anxiety and struggling may be dangerous to the animal with compromised ventilation, and restraint should be kept to a minimum, especially in cats. A small amount of a sedation can be given intravenously to effect (e.g., butorphanol [Torbugesic], 0.1 to 0.4 mg/kg, and diazepam [Valium], 0.05 to 0.2 mg/kg or acepromazine, .02 to .05 mg/kg). If the patient continues to struggle despite the sedation, the chest tube should be placed while the patient is under general anesthesia. Rapid induction is essential to gain rapid control of the airway. A cuffed endotracheal tube is placed, and positive-pressure ventilation is instituted. Ventilation is closely monitored because peak airway pressures greater than 30 cm H2O can cause significant decreases in cardiac output. Because of the underlying disorder, delivery of normal tidal volumes may not be possible. In these patients, smaller tidal volumes with a more rapid ventilatory rate should be used.
The skin is clipped over the entire lateral chest wall and cranial flank region and is aseptically prepared for surgery. Local anesthetic is infiltrated into the proposed site of tube insertion at the seventh intercostal space as previously described. This should include the nearby pleura and intercostal nerve. The skin over the lateral chest wall is pulled cranially by an assistant such that the skin over the ninth or tenth intercostal space overlies the seventh or eighth intercostal space. The skin should be pulled at least the same distance as two rib spaces (Figure 27-27A).
Using aseptic technique, a small skin incision is made in the middle of the seventh intercostal space (Figure 27-27B). Curved Kelly forceps are then used to separate the intercostal muscles in a controlled fashion (Figure 27-27C). The tips of the forceps are inserted into the incision, and mild pressure is exerted in a medial direction; the tips are then opened to spread the tissues, and then the forceps are removed (Figure 27-27D). This dissecting action is used to create a small defect in the pleural space (Figure 27-27E). A small amount of air is intentionally allowed to move into the pleural space, to cause the lung to retract away from the parietal pleura as the tips of the forceps penetrate the pleural space. This maneuver permits the chest tube to be inserted without injuring the lung. The hemostat is left in place to allow continued identification of the thoracotomy site. A stylet is used in the tube to help guide it into the appropriate position. The tip of the stylet should not protrude beyond the end of the tube. The tube tip is then passed into the chest cavity through intercostal musculature previously separated by the tip of the hemostat and is gently guided (without undue force) into the cranioventral thorax (Figure 27-27F). The stylet is removed, and the tube is rotated to ensure that it is not kinked. The assistant releases the skin so the skin returns to its original position, thus creating a subcutaneous tunnel for the tube (Figure 27-28). The tube is then anchored as described previously. If an assistant is not available, the skin incision should be made over the tenth or eleventh intercostal space, and a curved hemostat should be used bluntly to create a tunnel cranial to the seventh or eighth intercostal space. The catheter tip is then grasped in the jaws of stout hemostatic clamps, is passed down the subcutaneous tunnel, and is forced into the chest cavity through intercostal musculature previously separated by the tip of the hemostat. This maneuver is difficult and must be closely controlled to prevent overpenetration. Practice with a cadaver is recommended. Placing a tube using local anesthetic alone can be more easily accomplished using the former technique.
Placement of a thoracostomy tube can also be accomplished using a commercially available tube and trocar stylet unit, which is pushed through the chest wall. This procedure is strongly discouraged because of the high likelihood of iatrogenic injury to intrathoracic structures and the high degree of tolerance of the first procedure described earlier. The skin over the tenth to eleventh intercostal space is pulled cranially by an assistant to overlie the eighth to ninth intercostal space. The trocar-pointed stylet is then forced through the intercostal space with a controlled thrust. As soon as the tip of the tube enters the chest, the metal stylet is retracted to just inside the cannula. The rigidity of the stylet aids in manipulating the tube into the correct cranioventral position. The assistant then allows the patient’s skin to retract caudally to its normal position. Once released, the skin and subcutaneous tissue form a seal over the hole.
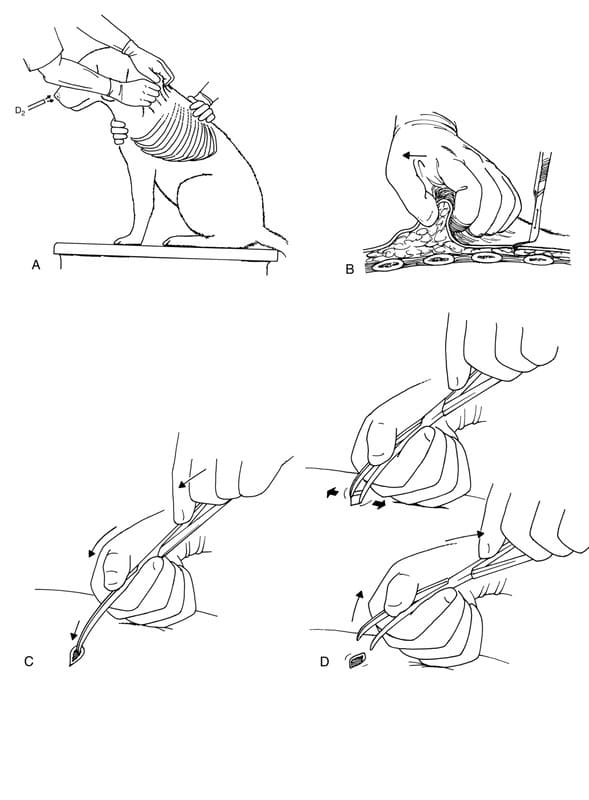
Figure 27-27. A-F. Placement of a chest tube with the skin pulled as far forward as possible that creates a flap when the tube is inserted and the skin is released.

Figure 27-27. A-F. (continued)

Figure 27-28. When the skin is allowed to return to normal position, a tunnel is created that helps to prevent air from migrating into the pleural space. Note the position of some of the side holes in the tube that allow air and fluid to drain from the pleural space as the lung reexpands (1 to 4).
Bandaging the Chest Tube
An occlusive dressing is placed using sterile antibiotic ointment or petrolatum over the ostomy site. The exiting catheter and torso are then wrapped gently but securely with gauze and tape for further protection. A stockinette can also be used to cover the entire area. The end of the catheter should be exposed near the dorsum of the animal’s back, and the rest of the catheter should be covered to prevent its being damaged or dislodged.
Methods of Pleural Space Evacuation
The open end of the tube must be attached to one of the following: 1) a Heimlich valve (Bard-Parker, Rutherford, NJ) or another one-way egress valve; 2) a three-way stopcock; 3) an underwater seal; 4) an underwater seal with controlled continuous, low-vacuum suction drainage (high-volume or low-volume types depend on the rate of air or fluid-blood accumulation); 5) an underwater seal with controlled, intermittent low-vacuum suction drainage; or 6) under emergency conditions, a regular suction unit with a side hole cut into the connective tubing to control the suction pressure. The choice of device depends on the size of the patient, the size of the air leak, the nature of the pleural fluid, and the patient’s tractability. All attachments to the chest tube should be secured with tape placed in a criss-cross fashion. This allows the inside of the tubing or attachment to be visualized. If the attachment is inadvertently pulled, the tape will tighten and prevent loosening or detachment.
Heimlich Valve
The Heimlich valve consists of a rubber one-way flutter valve that is enclosed in a clear plastic tube open at each end (Figure 27-29). The end of the chest tube is attached to the wide end of the flutter valve and is an excellent device for evacuating air. It is a good temporary device for evacuating blood and other fluids; however, the valve should be replaced frequently during drainage of blood or other tenacious fluids because the rubber valve becomes sticky and does not open freely. The end of a Heimlich valve has a fitting that accommodates a syringe in case manual suction is required. Although the valve has been used with success in animals weighing less than 15 kg, some smaller patients may not be able to generate sufficient increases in intrapleural pressure during expiration to open the valve and to allow evacuation. One-way valves are especially useful in the initial management of tension pneumothorax in patients weighing more than 15 kg if an underwater seal and suction system is not immediately available.

Figure 27-29. These diagrams demonstrate the function of the Heimlich flutter valves. A. During inspiration, the valve stays closed, and no air can enter the thoracic cavity. B. During expiration, as intrapleural pressure increases, the air or fluid is forced out of the pleural space through the chest tube and one-way valve. (From Bojrab MJ, ed. Current techniques in small animal surgery. 2nd ed. Philadelphia: Lea & Febiger, 1983.)
Stopcock
A stopcock attached to the end of a catheter prevents air or fluid from moving either in or out without manual operation. Its use is recommended in animals weighing less than 15 kg and in animals that are not accumulating air or fluid rapidly in their pleural cavity. The rate of fluid or air evacuation is determined by the size of the stopcock because the stopcock is of a smaller diameter than the chest tube. A large syringe is used for periodic aspiration by opening and closing the valve as needed to accomplish thoracentesis. The syringe plunger should be pulled back gently with only sufficient pressure applied to evacuate the fluid. Excessive pressure (greater than 30 cm H2O) can lead to lung injury or ineffective evacuation caused by the aspiration of mediastinal tissue.
Temporary Emergency Underwater Seal and Suction System
A disposable plastic intravenous administration set can be used to facilitate emergency drainage of large quantities of pleural effusion. The male end of the plastic tubing is fitted to the side arm of the stopcock, and the drip chamber is cut from the other end and is placed underwater. When the side arm tubing is filled and the stopcock is opened, drainage of the pleural space to a collecting vessel is possible by siphon action. To make and use an underwater seal, a length of tubing connected to the chest catheter is placed 1 to 2 cm below the fluid’s surface in a bowl or bottle containing 2 to 3 cm of sterile saline solution. This useful, quickly made underwater seal and one-way valve are recommended as a temporary measure when no other instruments or one-way valves are available and when time does not permit delayed action. The device can also be used for patients that need a vent if pleural fluid or air accumulates. When using this technique, care is taken to make sure that the tube stays submerged because, if the seal is broken, pneumothorax rapidly develops. Constant observation of this temporary device is mandatory.
Underwater Seal and Suction Drainage
Underwater seal and suction drainage of the pleura can be easily accomplished using several systems. Both two-bottle (Figure 27-30) and three-bottle (Figure 27-31) systems are adaptable to veterinary practice, and the equipment is unsophisticated and reusable. With a two-bottle suction drainage system, the chest catheter is connected to a 500- to 2000-mL sterile glass bottle containing enough sterile saline solution to fill it to a level of 2 to 3 cm from the bottom. The tube within the bottle is placed 1 to 2 cm below the surface of the saline solution. The bottle acts as both a collection reservoir and an underwater seal system to prevent air from being aspirated into the pleural space. A second bottle is partially filled with sterile saline solution and is connected to the first. A rigid plastic vent tube is open to room air, so it permits air to be aspirated into the bottle as vacuum is applied. Thus, by raising or lowering the tube in the second bottle, the amount of vacuum applied to the catheter extending into the patient’s chest can be controlled. If the vacuum regulation tube is submerged to 10 cm, the patient will not experience more than 20 cm water transpleural suction pressure.

Figure 27-30. Two-bottle suction drainage: A, Distal end of the chest tube exiting from the bandaged thorax: B, gum-rubber tubing (approximately half an inch in diameter) to allow “stripping” of the chest tube, about 3 feet long (see text): C, polyvinyl chloride “bubble” tubing. (From Bojrab MJ, ed. Current techniques in small animal surgery. 2nd ed. Philadelphia: Lea & Febiger, 1983.)
Experimental and clinical studies have shown that a continuous 15 to 20 cm negative pressure effectively aspirates tension pneumothorax and allows pulmonary visceral and parietal pleural surfaces to be approximated and to remain approximated. This pressure has proved to be key to the successful, spontaneous sealing of large defects in the lungs of human and animal patients. With the use of suction drainage, many pneumothoraces close, and the need for thoracotomy is thus obviated. This finding is in contrast to drainage without suction, experimental and clinical studies of which have shown that large leaks either do not seal or seal slowly.
With a three-bottle suction drainage system, the first bottle is connected to the chest catheter and acts as a fluid trap. Such a system is particularly useful if hemorrhage or hydrothorax is voluminous. If traumatic hemorrhage is severe, autotransfusion may be considered from this vessel. In this case, approximately 50 to 75 mL anticoagulant solution is initially added to the bottle. When 500 to 1000 mL blood has been aspirated, a second fluid trap bottle containing anticoagulant is substituted for the first bottle, and autotransfusion is begun. The second bottle of the three-bottle system is connected to the first bottle and acts as the underwater seal. Its function and filling are similar to those of the first bottle of a two-bottle system. The third bottle is connected to the second and again acts as suction regulator.

Figure 27-31. Three-bottle suction drainage: A, Distal end of the chest tube exiting from the bandaged thorax; B, gum-rubber tubing (approximately half an inch in diameter) to allow “stripping” of the tube, about 3 feet in length (see text); C, polyvinyl chloride “bubble” tubing. (From Bojrab MJ, ed. Current techniques in small animal surgery. 2nd ed. Philadelphia: Lea& Febiger, 1983.)
For the underwater seal and suction drainage system, at least the first 3 feet of the tubing leading from the chest catheter to the underwater seal should be made of gum rubber (Tomac amber latex intravenous tubing, American Hospital Supply Corp., McGaw Park, IL). Any animal whose chest catheter is connected to an underwater seal device by a tube must be watched carefully because knocking over of the bottles and detachment or chewing of the tubing can lead to massive pneumothorax. This possibility is the major drawback of the use of bottle suction systems in many small animal practices in which staff coverage is not available on a 24-hour basis. If an intensive care unit, hospital with 24-hour staff coverage, or emergency practice is available, however, continuous suction and drainage may be accomplished and continued for as long as necessary.
With several alternatives available, selection of a drainage system depends on the following criteria: 1) the patient’s size; 2) the type of material drained and its rate of accumulation within the pleural space; 3) the facilities and staff available for monitoring; and 4) economic considerations. Without question, the underwater seal and suction drainage system is the most effective. A three-bottle system is no longer available, but one may buy a two-bottle and a one-bottle system and combine them (American Hospital Supply Corp.). The Pleur-evac chest drainage unit (Deknatel, Inc., Fall River, MA) is a commercially available underwater seal system that is in essence a three-bottle system. This also has an autotransfusion system that can be attached for collecting blood for autotransfusion. The Pleur-evac does require the use of a suction unit to generate the vacuum powering the system. The AN50 Thorovac (H. W. Andersen Products, Inc., Haw River, NC) is a commercial example of a two-bottle system. This is an electrically driven underwater seal suction system. Up to 20 cm of water pressure can be generated; however, in patients with large leaks, the unit may not be able to evacuate rapidly enough. It is generally useful if the air leak from a pneumothorax is less than 500 mL per hour.
Troubleshooting and Tube Stripping
When using any form of continuous underwater suction system, the chest tube should be intermittently stripped and, in some cases, hand suctioned using a stopcock and syringe to ensure that the system is working adequately. The best way to hand suction using a stopcock is to attach a “Y” connector (Abbott Laboratories, Chicago) to the chest tube. A red rubber tube (Sovereign, Sherwood Medical Products) is used to connect the stopcock to the Y connector. The other end of the Y connector is attached to the suction tubing (Figure 27-32). A clamp is placed across the section of tubing not being used. This method allows either continuous suctioning or syringe aspiration without disruption of the connections.
With continuous-suction systems, leaks and generation of inadequate suction pressure are the two most common complications. Leaks can occur anywhere along the system from the ostomy site to the suction unit. If the tube was not tunneled at least two spaces, the tube may start to leak at the ostomy site. This is more likely to occur the longer the tube is in place because the skin edges retract around the ostomy site, thereby creating a larger hole. If the tube backs out of the chest, holes in the tube may communicate with the environment.

Figure 27-32. Y connecter attached to a chest tube to allow a continuous-suction system to be connected as well as a stopcock to aspirate intermittently, to ensure function of the continuous system and to act as a “fail safe” for evacuation of the pleural space if the system stops working properly.
The pressure generated at the chest tube should be checked periodically. This can be done by placing a manometer near the chest tube and monitoring the pressure as the suction is applied. A commercial manometer (Vital Signs Inc., Totawa, NJ) can be used for this purpose, or tubing can be placed in a bottle of sterile saline. A column of saline pulled upward into the tubing should be between 15 and 20 cm above the surface of the saline. The pressure indicated at the suction unit itself is always less than the pressure generated at the chest tube because of resistance within the tubing. This problem worsens in proportion to the length and collapsibility of the tubing.
Fluid accumulations within the suction tubing also interfere with operation of the system. Stripping is required to keep the fluid from accumulating. By grasping the tubing as near to the patient as possible and by pinching it closed, a stripping motion (a sliding motion, with the tube pinched off) is applied along the length of the tube for 20 to 40 cm (Figure 27-33). The stripping action creates a sudden, high negative pressure inside the tube past the area where the tube has been pinched closed. At the end of each stripping action, the pinch is released, and a surge of negative pressure is transferred to the thoracic catheter. The high negative pressure generated also loosens and evacuates fibrin clots and debris inside the catheter. This stripping should be done every hour when a significant amount of blood or other viscous or sticky fluid is encountered. The frequency of stripping may be decreased as the amount of fluid removed decreases. Generally, by the second day, stripping is only necessary every 4 to 8 hours.

Figure 27-33. Chest tube stripping done by a nurse every 6 to 8 hours to keep the tubing and the tube patent. The left hand pinches the tubing (made of gum rubber) shut, and the right hand is used to strip the tube, by pinching and then sliding using the thumb and index finger, which are lubricated with water or petroleum jelly. When the right hand meets the left, the tube in the left hand is allowed to snap open, creating a sudden popping of air.
Special Considerations for the Rapid Accumulation of Fluid or Air
Currently, an underwater seal and suction drainage system attached to the chest tube is the recommended method of treatment for trauma or disease conditions involving the continuous or rapid accumulation of air or fluid in the pleural space. In these situations, a Heimlich valve should only be used as a temporary means of evacuating the chest if the patient’s weight exceeds 15 kg, such as when transporting the patient from the emergency treatment area to the intensive care unit. For patients under 15 kg, use of a three-way stopcock and syringe is the only method recommended for the drainage of rapid accumulation of air or fluid other than underwater seal and suction systems.
Under emergency conditions, if an underwater seal and suction system is not immediately available, a regular suction unit can be used. The vacuum is reduced to 20 to 30 cm H2O by one of three methods: 1) cutting a small hole in the side of the tubing; 2) partially clamping the tubing; and, 3) opening the “escape” valve or using the control valve on the suction unit.
Analgesia
The presence of chest tubes can be painful for the patient, and analgesia should be administered on a regular basis as required. Intercostal nerve blocks can be provided with 0.25 to 1.0 mL of 0.25% bupivacaine through intermittent injections or with the use of an indwelling catheter. Intrapleural analgesia is best provided with 0.25 to 0.5% bupivacaine (up to 2 mg/kg) administered into the chest tube. The addition of sodium bicarbonate (one-third sodium bicarbonate to two-thirds bupivacaine) to the local anesthetic helps to decrease the irritation from the acidity of the drug. Warming the medication to body temperature and administering the drugs slowly also provide less discomfort. Systemic administration of a neuroleptanalgesic is also recommended in combination with local analgesia.
Tube Removal
The chest drain should be removed whenever it is no longer needed. This time may range from the immediate postoperative period to more than a week. Suction should be continued until no air has been removed for 12 to 24 hours or until fluid accumulations are less than 1 to 2 mL/kg per day. If any question exists concerning the safe removal of the chest tube, it should be clamped for 24 hours. The patient should be closely monitored during this time, and the tube should be suctioned if the patient has any evidence of respiratory compromise. The tube is aspirated after the 24-hour period, and radiographs are then taken to determine whether any intrapleural accumulation of air or fluid is present. If no accumulation is present, the tube may be safely removed.
When the surgeon determines that the tube is no longer needed, the bandage and sutures are removed, and the tube is quickly removed using traction. The hole is covered with a gauze dressing impregnated with an antibiotic ointment. The gauze is held in place with a torso bandage. Complete sealing of the wound generally occurs in 2 or 3 days. Until then, the dressing is changed as required to maintain a clean, dry, and occlusive (with ointment) environment.
Complications
As previously mentioned, whenever the patient must be left unattended, the entire chest catheter and attached apparatus must be covered completely under a well-secured dressing to prevent disturbance or dis-lodgment. If disconnection occurs in the patient with a large-bore chest tube, death can occur within 5 to 10 minutes because of the effects of a progressive pneumothorax.
An occasional problem is the accumulation of fibrin clots, especially when a small-lumen-diameter catheter (smaller than 20 French) is used or when a large amount of fibrin, blood, or other proteinaceous material is drained. Blockage is prevented by frequent stripping of the tubing. When using a three-way stopcock on the end of the chest catheter, a small amount of sterile heparinized saline solution can be infused every few hours; when using the Heimlich valve or other one-way rubber valve, it may be necessary to change the valve frequently.
Reexpansion pulmonary edema has been occasionally reported in patients with chronic cases of atelectasis when the lung is reinflated rapidly after rapid removal of pleural fluid or air. In general, this complication is not seen until the lungs have been atelectatic for longer than 3 days.
Another reported complication is subcutaneous emphysema as the result of a large hole in the chest wall that is not completely occluded by the presence of the drainage tube. An occlusive dressing applied around the exit site helps to minimize this problem. Lung tissue entrapment and subsequent infarction by vigorous chest suction have been reported. This complication may be considered whenever a radiographic pulmonary infiltrate appears near a side or end hole of the chest tube. Unregulated, high vacuum levels, as in operating room or portable suction units (80 to 120 mm Hg), should not be used. All active suction must be regulated by a two- or three-bottle system, the emergency system mentioned earlier, or, if one is aspirating with a syringe, it should be done gently.
Although infection can occur whenever any indwelling catheter is used, this problem is minimized by careful tube placement and care. In a randomized study of 120 human patients with indwelling chest drains, half were treated with prophylactic antibiotics, and the other half were given a placebo. Those patients given antibiotics had the higher infection rate. Our clinical results with the use of chest drains in dogs and cats also seem to indicate similar conclusions. Proper wound care at the site where the drainage catheter enters the chest and strict attention to aseptic technique and suction drainage remain the most important factors in preventing serious infection of the pleural cavity and subcutaneous tissue. If any concerns exists, the evacuated fluid should undergo periodic cytologic assessment, and Gram staining and culture should be performed as indicated. Culture of tips of the tubes on removal should be considered in any tubes that have been in place for an extended period.
A rare complication of chest tubes is phrenic nerve irritation and palsy. This problem may be severe enough to cause diaphragmatic paresis. If the tube rubs the pericardium or the heart after pericardi-ectomy, arrhythmias may occur. These are generally self-limiting.
If the tube has been in place for several days, adhesions may have formed, and mild intrathoracic bleeding may occur when the tube is removed. Rarely, bleeding may persist to the point that surgical exploration and vessel ligation are required.
Comments
Often, animals suffering from multiple injuries, including fractures, have a pneumothorax. Mild pneumothoraces do not cause respiratory distress, but they are readily diagnosed by chest radiographs. If anesthesia is necessary for fracture repair, a chest tube should be inserted to aid resolution of the pneumothorax, to help in lung healing, and to allow earlier and safer use of anesthesia. Positive-pressure ventilation during anesthesia may predispose the healing lung or bronchus to rupture. Without a chest tube in place, a tension pneumothorax can rapidly develop and can prove fatal. The placement of prophylactic chest tubes is also indicated in patients with lung injury that require positive-pressure ventilation.
Bilateral chest tubes may be required to permit adequate evacuation of the pleural space. In many trauma patients, the mediastinum ruptures, thus allowing both sides of the thorax to be evacuated with a unilateral tube. However, the mediastinum may seal, and a second tube may be required. In many patients with bilateral fluid accumulations, chest tubes may be required on both sides of the thorax to provide effective drainage because the mediastinum is intact and is often thicker than normal.
Chest tubes can be used as a method of core re-warming of the severely hypothermic patient. In such cases, through-and-through lavage is done with warm sterile saline. Instillation of sterile saline or lactated Ringer’s solution into the pleural cavity using chest tubes can also be used for the treatment of uremia, similar to peritoneal dialysis.
Suggested Readings
Brandstetter RD, Cohen RP. Hypoxemia after thoracentesis. JAMA 1979;242:1060.
Butler WB. Use of a flutter valve in treatment of pneumothorax dogs and cats. J Am Vet Med Assoc 1969;155:1997.
Crowe DT. Help for the patient with thoracic hemorrhage. Vet Med 1988:83:578-588.
Graham JM, Mattox KL, Beall AC. Penetrating trauma of the lung. J. Trauma 1979; 19:665.
Griffith GL, et al. Acute traumatic hemothorax. Ann Thorac Surg 1978:26:204.
Harrah JD, Wangensteen SL. A simple emergency closed thoracostomy set. Surgery 1970:68:583.
Holtsinger RH, Beale BS, Bellah JR. et al. Spontaneous pneumothorax in the dog: a retrospective analysis of 21 cases 1993; 29:195-210.
Richards W. Tube thoracostomy. J Fam Pract 1978;6:629.
Sauer BW. Valve drainage of the pleural cavity of the dog. J Am Vet Med Assoc 1969;155:1977.
Turner WD, Breznock EM. Continuous suction drainage for management of canine pyothorax: a retrospective study. J Am Anim Hosp Assoc 1988;24:485-494.
Withrow SJ, Fenner WR, Wilkins RJ. Closed chest drainage and lavage for treatment of pyothorax in the cat. J Am Anim Hosp Assoc 1975:11:90.
Zimmerman JE, Dunbar BS, Klingenmaier CH. Management of subcutaneous emphysema, pneumomediastinum, and pneumothorax during respirator therapy. Crit Care Med 1975:3:69.
About
How to reference this publication (Harvard system)?
(2021) “Lung and Thoracic Cavity”, Current Techniques in Small Animal Surgery (5th Edition). Available at: https://www.ivis.org/library/current-techniques-small-animal-surgery-5th-edition/lung-and-thoracic-cavity (Accessed: 17 June 2024).
Author(s)


Copyright Statement
© All text and images in this publication are copyright protected and cannot be reproduced or copied in any way.Buy this book
Buy this book
This book and many other titles are available from Teton Newmedia, your premier source for Veterinary Medicine books. To better serve you, the Teton NewMedia titles are now also available through CRC Press. Teton NewMedia is committed to providing alternative, interactive content including print, CD-ROM, web-based applications and eBooks.

Teton NewMedia
PO Box 4833
Jackson, WY 83001
307.734.0441
Email: [email protected]
Comments (0)
Ask the author
0 comments