

Bandaging and Drainage Techniques
Updated:
APR 21, 2021
Languages:
Read
Bandaging Open Wounds
Mark W. Bohling and Steven F. Swaim
Wounds that are large, have extensive tissue damage, and are either contaminated or infected may be managed as open wounds until delayed primary or secondary closure can be performed, or alternatively, may be managed as open wounds throughout the entire healing process. The proper use of bandages and medications helps to provide an optimal environment for development of healthy tissue for wound closure. These techniques also help to provide an environment for rapid progression of contraction and epithelialization of wounds that will heal by second intention.
Bandage Components
A bandage consists of three layers, each of which has distinctive characteristics and functions (Figure 2-1).
Figure 2-1. The component layers of a bandage. (From Swaim SF, Wilhalf D. The physics, physiology, and chemistry of bandaging open wounds. Compend Contin Educ 1985;7:146.)
Primary (Contact) Layer
The primary (contact) layer of a bandage should be sterile and should remain in close contact with the wound surface whether the animal is resting or moving. This layer should conform to all contours of the wound and, except for moisture retentive dressings (MRD), should allow fluid from draining wounds to pass through to the absorbent, secondary bandage layer. Depending on the wound type and stage of healing, the primary (contact) layer can function in tissue debridement, delivery of medication, removal of wound exudate, or in forming an occlusive seal over the wound. The primary layer is important in providing an environment that promotes healing as opposed to being a layer that just covers a wound. The properties of this layer vary, and it is important to select a dressing material that is appropriate for the current healing stage and to change the dressing type as healing progresses. There are materials that interact with wound tissues to enhance healing rather than to just conceal the wound.
Highly Absorptive Dressings
Gauze dressings are used as an initial dressing on heavily contaminated, infected, and debris-laden wounds. These wounds are in the inflammatory stage of healing. As healing progresses, the primary dressing is changed to one that will promote healing.
Gauze Dressings
Wet-to-dry and dry-to-dry gauze dressings are older techniques used to clean a wound. For wet-to-dry dressings, sterile saline, lactated Ringers solution, or 0.05% chlorhexidine diacetate solution is used to wet the gauze before placing it on a wound with viscous exudate or necrotic material. Exudates are diluted and absorbed into the secondary bandage layer. The fluid evaporates, the bandage dries and adheres to the wound. Bandage removal results in removal of adherent necrotic tissue and debris (Figure 2-2). Because this removal may be painful, moistening the gauze with warm 2% lidocaine may make removal more comfortable for the animal. On cats, warm saline is used to moisten the gauze.
Dry-to-dry gauze bandages are used to clean wounds that have a low viscosity exudate. The gauze is applied dry, and it absorbs the exudate, which evaporates. Removal of the adherent gauze is done as described above with similar results (Figure 2-2).
Gauze dressings have several disadvantages. 1.) Both viable and nonviable tissue are removed with dressing change. 2.) The function of cells and enzymes involved in healing are impaired. 3.) If a gauze is too wet, exogenous bacteria can wick toward the wound, and a wet bandage favors tissue maceration. 4.) Bacteria can be dispersed into the air by a dry gauze at bandage change. 5.) Adherent gauze fibers can remain in a wound to cause inflammation. 6.) Bandage removal can be painful. 7.) Cytokines and growth factors essential for optimal healing are removed with the gauze.

Figure 2-2. With both dry to dry and wet to dry bandages, wound exudate is absorbed into the intermediate bandage layers (arrows). As exudate is absorbed and the bandage dries, necrotic tissue and foreign material adhere to the contact layer. Exudate, necrotic tissue, and foreign material are removed with the bandage. (From Swaim SF, Wilhalf D. The physics, physiology,. and chemistry of bandaging open wounds. Compend Contin Educ Pract Vet 1985;7:146.)
Hypertonic Saline Dressings
These dressings are used in infected or highly necrotic, heavily exudative wounds. They have a 20% sodium chloride content which has the osmotic effect of drawing wound fluid from the tissue to reduce edema and increase circulation. The dressings are changed every one to two days until infection and necrosis are controlled. The dressing desicates both bacteria and tissue. Thus, debridement by these dressings is nonselective in that both healthy and necrotic tissue are removed. Once the wound has reached a moderately exudating granulation tissue stage, a calcium alginate, hydrogel, or foam dressing can be used.
Calcium Alginate Dressings
These are hydrophilic dressings that should be used in moderate to highly exudative wounds, such as would be the case in wounds in the inflammatory stage of healing. They should not be used over exposed bone, muscle, tendons or dry necrotic tissue. They are a felt-like material in a rope or pad form. The calcium alginate of the dressing interacts with wound fluid sodium to create a sodium aliginate gel that maintains a moist wound environment.
The hydrophilic/absorptive nature of the dressing can dehydrate a wound as healing progresses and exudate decreases. If it is left in a wound too long, it dehydrates, hardens, and forms a calcium aliginate eschar which is difficult to remove unless it is rehydrated with saline.
Calcium aliginate dressings are good for the transition from the inflammatory to the repair stage of healing. They enhance autolytic debridement and granulation tissue formation. Two other advantageous properties of the dressing are its hemostatic properties and its ability to entrap bacteria in the gel so they can be lavaged from the wound at dressing change.
Copolymer Starch Dressings
Another type of dressing that can be used in moderate to highly exudative, necrotic infected wounds is a highly absorptive copolymer starch dressing. A hydrocolloid dressing can be placed over the copolymer starch dressing as an occlusive dressing to hold it in place and retain moisture. At dressing change, lavage removes the copolymer from the wound.
The exudate amount in a wound should be observed while using this dressing. As healing progresses, fluid production decreases. If fluid levels get too low, the copolymer adheres to the wound and tissue damage can result when it is removed.
Moisture Retentive Dressings
Moisture retentive dressings (MRDs) provide a warm, moist wound environment that enhances cell proliferation and function during the inflammatory and repair healing stages. The fluid retained over the wound contains the cytokines, growth factors, proteases and protease inhibitors at the proper levels to support healing. In general, a highly absorptive dressing, such as those stated earlier, could be used initially in a wound with considerable necrosis, debris, infection and exudate. Once the wound is relatively clean, then an MRD could be considered.
There are several advantages to MRDs in promoting wound healing (Table 2-1). However, they also have the disadvantages that they can cause softening of periwound skin from retained moisture (maceration) and periwound tissue damage from retained proteolytic enzymes (excoriation).
Polyurethane Foam Dressings
Polyurethane foam dressings are soft, compressible, nonadherent, highly conforming dressings. They are highly absorptive and indicated for use on moderate to highly exudative wounds. The dressings maintain a moist wound environment which enhances autolytic debridement. They promote granulation tissue formation and epithelialization. Thus, the dressings can be used in both the inflammatory and repair stages of healing. An alternative use of the dressing is to saturate it with liquid medication for application on the wound.
The stage of healing governs the frequency of changing foam dressings. It can vary between one and seven days, with the longer times time between changes being in the late stages of management when there is less fluid production.
| Table 2-1. Advantages of Moisture-Retentive Dressings (MRDs)* |
|
Source: Campbell BG. Dressings, bandages, and splints for wound management in dogs and cats. In: Veterinary Clinics of North America: Small Animal Practice. 36(4): 759-91, 2006. Philadelphia: Saunders.
Polyurethane Film Dressings
These film dressings are flexible, transparent, thin semiocclusive (permeable to gas but not water or bacteria) sheets. The transparency allows wound observation, and their adhesive perimeter provides for attachment to periwound skin. Because they are nonabsorptive, they are indicated for wounds with little or no exudate. Thus they are suited for dry necrotic eschars or shallow wounds, such as partial thickness wounds, e.g. abrasions. These dressings could also be used in the late repair stage of healing where there is a small amount of fluid production and a need to retain this to promote epithelialization. Another use is to place the dressings over other contact layers to cause moisture retention and supply a bacteria and waterproof cover.
These film dressings are contraindicated in wounds that are infected and have high exudate levels and wounds with fragile periwound skin. Neither should films be used on wounds with exposed tendon, muscle, bone, or deep burn wounds.
Adherence of the films is poor in areas of skin folds or unshaved hair, and hair growth on periwound skin can push the adhesive attachment off. However, adherence to periwound skin can be improved with vapor-permeable film spray.
A cloudy white to yellow exudate under the film is just wound surface exudate and should not be confused with infection. The presence of heat, swelling, pain and hyperemia in surrounding tissues would indicate infection.
Hydrogel Dressings
Hydrogels are water-rich gel dressings in the form of a sheet or amorphorus gel. Some of these dressings contain other medications that are beneficial to wound healing, such as acemannan, metronidazole or silver sulfadiazin antimicrobials.
Because of their high water content, the dressings can be used to rehydrate tissues in wounds with an eschar or dry sloughing tissue. A nonadherent semi-occlusive dressing or vapor-permeable polyurethane film can be placed over a hydrogel dressing to assure that its moisture is transferred to the tissue and not to the secondary bandage layer. Some hydrogels have an impermeable covering as part of the dressing to serve this purpose. Conversely to wound hydration, some hydrogels can absorb wound fluid and can be used in exudative wounds. These dressings can be used in necrotic wounds to provide a moist environment to enhance autolytic debridement and promote granulation tissue formation.
Hydrogel dressings are generally changed every three days in noninfected wounds, but if the dressing contains an antimicrobial or wound healing stimulant, daily bandage change may be necessary to maintain their activity in the wound. Hydrogel dressings can be changed every four to seven days when they are used to treat abrasions that have minimal exudates. Any hydrogel remaining on the wound at dressing change can be removed with gentle saline lavage.
Hydrocolloid Dressings
These are dressings made of a combination of elastomeric and absorbent components which form a gel when they interact with wound fluid. Some dressings have an outer occlusive polyurethane film. The hydrocolloid adheres to periwound skin while the dressing over the wound interacts with the wound fluid to produce an occlusive gel. This gel may have a yellow purulent appearance and have a mild odor; however, this should not be interpreted as infection it is surface bacterial growth. Infection would be manifested as hyperemia, pain, swelling and heat of the wound and periwound tissues. The gel is more tenacious than just exudate or the gel from hydrogel dressings.
The sheet form of the dressing is the one most frequently used. It provides a thermally insulated moist environment that is impermeable to gas, bacteria and fluid.
These dressings can be used on partial or full thickness wounds with clean or necrotic bases. Such wounds would include pressure wounds, minor burns, abrasions, or graft donor sites. Hydrocolloids can be used in the inflammatory and repair stages of healing. In the inflammatory stage they promote autolytic debridement, and in the repair stage they stimulate granulation tissue, collagen syntheses, and epithelialization. However, wound contraction may be slowed by the dressing adherence to periwound skin.
The dressings should not be used in infected wounds producing large amounts of exudate. The retained exudate can lead to maceration and excoriation of periwound skin.
To apply the dressing, the periwound skin is prepared aseptically. The sheet is cut to a size about two centimeters larger than the wound. The backing is removed from the sheet and it is placed over the wound. The dressing should be changed in about two or three days when it feels like a fluid filled blister over the wound. Change should take place before this fluid leaks from under the dressing edge. Lavage and gentle wiping are used to remove the gel from the wound and periwound skin.
Nonadherent Semiocclusive Dressings
These dressings are porous to allow fluid to move through them into the secondary bandage layer where it can evaporate. However, their absorptive capacity is low, and their porosity can allow exogenous bacteria to wick toward a wound. The dressings are generally used when a wound is in the repair stage of healing.
The dressing can be either an absorbent material encased in a perforated nonadherent covering or a wide mesh gauze impregnated with petrolatum. Although they are classified as nonadherent, these dressings can adhere to a wound. With the petrolatum impregnated gauze, granulation tissue and epithelium can grow into the interstices of the gauze to cause adherence. With the perforated nonadherent dressings exudate can dry in the perforations to adhere the pad to the wound.
Petrolatum impregnated gauze should be used early in the repair stage of healing and should be changed frequently enough to prevent granulation tissue from growing into the mesh openings. Because petrolatum may interfere with epithelialization, its early use may prevent this interference. However, once epithelialization starts, a perforated nonadherent material with absorbent filler should be used.
If the perforated nonadherent material with absorbent filler is used, its purpose is to retain some moisture over the wound to promote epithelialization while allowing excess fluid to be absorbed into the secondary bandage layer (Figure 2-3). This dressing is indicated for superficial wounds that have low to moderate exudate levels. They are often used in the latter part of the repair stage of healing when exudate levels are low. They are a good primary dressing for sutured wounds.

Figure 2-3. With a nonadherent semiocculsive bandage, the primary layer allows absorption of enough excess fluid to prevent tissue maceration (longer arrows penetrating the primary layer) but retains sufficient moisture to prevent dehydration and promote healing (shorter arrows). (From Swaim SF, Wilhalf D. The physics, physiology, and chemistry of bandaging open wounds. Compend Contin Educ Pract Vet 1985;7:146.)
Antimicrobial Dressings
Antimicrobial dressings may contain such agents as iodine, silver, polyhexamethylene biguanide, activated charcoal and antibiotics. Such dressings are indicated to treat infected wounds or wounds at risk for infection. Because these dressings are not moisture retentive, covering them with a polyurethane film dressing may help keep them from drying out.
Iodine dressings contain cadexomer iodine which is released into the wound without a negative effect on wound cells. The dressings are designed to maintain sufficient active iodine levels for about 48 hours.
Dressings with silver ions have a broad antimicrobial activity, which can be effective against otherwise antibiotic resistant organisms, and some mycotic organisms. Various silver-containing dressings are available to include gauze, gauze roll, low adherent, hydrocolloid, hydrogel and alignate dressings.
Polyhexamethylene biguanide (PHMB) is an antiseptic related to chlorhexidine. Gauze sponges and roll gauze have been impregnated with PHMB to provide an antimicrobial dressing (Kerlix® A.M.D., Covidien Co., Mansfield, MA). PHMB is a broad spectrum bactericide, and bacteria do not develop a resistance to it. PHMB-impregnated dressings have prolonged antibacterial activity and thus can prevent wound bacteria from contaminating the environment as well as resisting the penetration of exogenous bacteria into the bandage.
Activated charcoal dressings absorb bacteria and reduce wound odor. They also provide a moist wound environment.
Type I bovine collagen sponges impregnated with gentamicin provide high local levels of antibiotic, but serum levels remain below toxic levels. Such dressings have also been reported to have a hemostatic property.
Extracellular Matrix Bioscaffold Dressings
The extracellular matrix dressings (ECMs) are acellular biodegradable sheets with a three-dimensional ultrastructure. They are derived from porcine small intestinal submucosa (SIS) or porcine urinary bladder submucosa matrix (UBM). The ECMs contain structural proteins, growth factors, cytokines, and their inhibitors. Within two weeks of their presence in a wound there is degradation of the scaffold and the degradation products are chemotactic for repair cells. The repair cells enter the wound as stem cells and they deposit a site-specific matrix. For example, if the dressing is placed in a skin wound, the matrix will be skin/ dermis-like. By 30 to 90 days, the bioscaffold is replaced by site-specific tissue.
The ECMs are utilized in a unique way. The wound must be thoroughly debrided, free of topical medications, cleaning agents and exudates. Infection should be eliminated or well-controlled. The ECM sheet is cut to a size slightly larger than the wound. It is rehydrated with saline, tucked under the skin wound edge, and sutured in place. It can be fenestrated if drainage is expected. A nonadhesive or moisture retentive dressing is placed over the ECM. In three to four days, at the first bandage change, all bandage parts are changed except the ECM. It will have a degenerated yellow or brown appearance. A second piece of ECM is placed over the degenerated first piece without removing it and the outer bandage is replaced. The next dressing change is in four to seven days. After two to three ECM applications, no new dressings are added. Usually a granulation tissue bed is present containing a site-specific matrix which will direct the wound healing with tissue like that of the surrounding area. Bandaging of the granulating wound is continued as healing progresses.
Secondary (Intermediate) Layer
Removal of bacteria, exudate, and debris from a wound by wound debridement, lavage, and chemotherapeutics greatly facilitates wound healing. Bandages can assist in this process by absorbing deleterious agents and removing them from a wound. Absorption of serum, blood, exudate, necrotic debris, and bacteria occurs within the secondary bandage layer. If a bandage allows evaporation of fluid (drying), then the exudate becomes concentrated, retarding bacterial growth.
The secondary bandage layer is usually started with a wide-mesh gauze product; (Sof Band® Bulky Bandage, Johnson & Johnson, New Brunswick, NJ; Kerlix® rolls, Covidien, Mansfield, MA) this layer should have a random pattern of fibers to provide maximum capillarity and absorption. It should be applied in a continuous wrapping layers from distal to proximal on the limbs. For the first layer over the primary (contact) layer and the skin of the leg, it is of particular importance to apply the gauze so as to have no wrinkles or folds contacting the skin. Such folds cause pressure spots and make the bandage uncomfortable to the patient, thereby inciting self trauma. This means that it is more important to follow the natural contours of the limb when applying the initial layer, rather than to adhere to a predetermined amount of overlapping of the gauze. Subsequent layers should be applied with approximately 50% overlap. The secondary layer should be applied thickly enough to collect absorbed fluid as well as to pad, protect, and immobilize the wound; besides using roll gauze exclusively, another way to build up the secondary layer is to apply roll cotton or cotton cast padding (Specialist® Cast Padding rolls, Johnson & Johnson, New Brunswick, NJ) over the initial gauze layer to provide additional absorption and padding. Besides its excellent conforming and cushioning properties, cotton cast padding has the further advantage of being relatively safe to apply, as it is difficult to apply it too tightly because it tears under low tension. Cotton cast padding or roll cotton should not be used directly over the primary (contact) layer, as these products could leave lint in the wound.
The frequency of bandage changes depends on the volume of wound discharge and the storage capacity of the absorptive layer. Thus, wounds in the early stages of healing usually produce a greater volume of exudate and require more frequent bandage changes, though seldom more frequently than twice daily in the authors’ experience. One consequence of waiting too long between bandage changes, particularly with contaminated, highly exudative wounds, is that the wet bandage material becomes a culture medium for bacterial growth and perpetuates infection rather than helping to remove it. In addition, if the outer bandage becomes wet (“strike-through”), contamination by exogenous bacteria can occur. Specialized gauze products that have been impregnated with polyhexamethylene biguanide as an antimi- crobial (Kerlix® A.M.D., Kendall Co., Mansfield, MA) have been effective in the authors’ experience in suppression of bacterial overgrowth in bandages. Even though these antimicrobial dressings have been found effective in preventing exogenous bacteria from contaminating wounds, it is still important to change the bandage before the intermediate layer becomes completely saturated. As healing progresses and wound fluid production decreases, or when an MRD is used, the secondary layer/bandage is changed less often.
Tertiary (Outer) Layer
The tertiary layer of a bandage serves primarily to hold other dressings in place and to immobilize the wounded area, especially when a splint is incorporated in the bandage. Surgical adhesive tape (porous, waterproof, or elastic) is commonly used for veterinary bandaging. Porous tape (Zonas® porous tape, Johnson & Johnson, New Brunswick, NJ; Curity® standard porous tape, Covidien, Mansfield, MA) allows fluid evaporation, thus promoting dryness, but, if the bandage becomes wet from exogenous fluid, surface bacteria can move inward by capillary action and contaminate the wound. Although the antimicrobial dressings help prevent this problem, it is desirable to maintain a dry bandage surface. Waterproof tape can protect a wound from exogenous fluid; however, if it is not properly applied, fluid can still enter the bandage and will be retained. Waterproof tape also tends to create an occlusive bandage that may lead to tissue maceration; therefore, it is primarily indicated for wounds that are not producing large amounts of fluid. Elastic coadhesive wrap (Vetrap® bandaging tape, 3M Co., St. Paul, MN; PetFlex®, Andover Products, Salisbury, MA) provides pressure, conformation, and immobilization. We use porous adhesive tape more often than either waterproof tape or elastic wrap.
If a wound has considerable drainage and absorption is the major function of the bandage, the tertiary layer of the bandage should be placed just tightly enough to hold all layers of the bandage in close contact with each other. An excessively loose bandage, with insufficient contact between the primary and secondary layers, allows fluid to accumulate over the wound, leading to tissue maceration. At the other extreme, if the tertiary layer is applied too tightly, it may compress the intermediate layer and reduce absorption, impede tissue blood supply, and impair wound contraction (Figure 2-4). In addition, overly tight application of bandages on the head and/or neck can lead to occlusion of the pharyngeal area and respiratory embarassment.

Figure 2-4. Pressure exerted by tertiary bandage layer. A. Ideal pressure. All bandage layers are in contact with each other, and the best absorption takes place. B. Too loose. All bandage layers are not in contact with each other and the wound; fluid may accumulate. C. Too tight. All bandage layers are compressed, resulting in decreased absorption and possibly reduction in tissue blood supply and wound contraction. (From Swaim SF, Wilhalf D. The physics, physiology, and chemistry of bandaging open wounds. Compend Contin Educ Pract Vet 1985;7:146.)
The tertiary bandage layer helps to ensure that a limb bandage remains in place. The final piece of adhesive tape is placed half on the bandage and half on the skin to prevent bandage slippage. To help adhere the tape to the skin, a hand is held over the tape for about a minute. The heat from the hand and from the animal’s body softens the adhesive on the tape, making it more sticky so as to adhere better to the animal’s skin. To help assure adhesion of the tape, a polymeric solution of hexamethyldisiloxane acrylate (Cavilon No Sting Barrier Film, 3M Health Care, St. Paul, MN) may be sprayed on the skin adjacent to the top of the bandage. In addition, when the tape is removed, this solution may be sprayed on the tape to help prevent epidermal stripping. When there are no open draining wounds on the paw, tape stirrups on the paw with incorporation in the bandage also help secure limb bandages.
Pressure Bandages
A bandage may be placed to apply therapeutic pressure to an open wound or damaged limb. One indication for pressure bandages is control of minor hemorrhage; however, they must be used with caution and only for a short period of time. Pressure bandages can help to control peripheral edema, and they are more effective in controlling edema from venous or lymphatic stasis than inflammatory edema. Pressure bandages also help to prevent formation of exuberant granulation tissue, to obliterate dead space, and to immobilize fractures and other wounds.
Unless an elastic material is used to apply tension continuously, it is difficult to maintain pressure on a wound surface by using cotton or linen dressings. When cotton and similar materials are applied as a pressure bandage, they generally become compressed in a short time and thus no longer act as a pressure bandage. However, if cotton and linen do not compress sufficiently to relieve the constricting effect of tightly applied adhesive tape, the result may be circulatory embarrassment of the wound and bandaged structure.
A properly applied pressure bandage made with elastic material tends to keep some dynamic pressure on the wound as the patient moves. Even when an elastic material is used for a pressure bandage, excess pressure can impair arterial, venous, and lymphatic flow and can lead to tissue slough as well as nerve impingement. Therefore, the area of the limb distal to a pressure bandage should be carefully inspected for signs of swelling, hypothermia, cyanosis, moisture, loss of sensation, or odor; this duty should be performed at least twice daily by the veterinarian on hospitalized patients or by the client on outpatients. Many limb bandages are applied so as to include the entire foot; therefore the pad surfaces of the two middle digits should be left exposed so that they may be examined. An animal will usually not disturb a comfortable, properly applied bandage; if it licks or chews a pressure bandage, the bandage should be removed and the area should be examined.
Pressure caused by an elastic pressure bandage is governed by five factors: 1) the elasticity of the material used. Higher elasticity equates to more pressure, 2) tension applied at the time of application, 3) width of the tape, i.e., the narrower the tape, the greater the local pressure, and 4) the number and overlap of layers. The pressure produced by these factors is additive. Lastly, pressure is inversely proportional to the circumference of the bandaged body part, i.e., the smaller the circumference, the more pressure is applied, and the greater is the chance of circulatory compromise. Therefore, care should be taken when moving from an area of small circumference to one of larger circumference while bandaging.
For example, when bandaging a limb from distal to proximal, the distal portion of the bandage should be applied with less tension to prevent excessive constriction of this smaller circumference area.
Practice can help assure that elastic tape is applied with the proper tension. As the tape is applied off the roll, it is secured near the bandage with one hand while pulling tape off the roll. Thus, the danger of applying it too tightly is reduced. Another guideline for tape application is to apply it such that the textured pattern of the material is slightly distorted but sill visible. Wraps should overlap one-third to one-half the tape width.
Pressure Relieving Bandages
Bandages may also be configured to relieve pressure on an injured body part. The shape of the bandaged surface has an effect on the amount of pressure exerted on the tissue. The more convex the surface, the greater is the pressure exerted by the dressing on the tissue. Adding more gauze padding over a convex surface makes it even more convex, further increasing pressure. This can be detrimental when treating an open wound over a convex surface. Placing more padding over the wound in an attempt to protect it from pressure has the effect of increasing the pressure and impairing healing. Pressure relieving bandages are indicated for bandaging such areas.
Cast padding material (Specialist Cast Padding, Johnson & Johnson Orthopaedics, Raynham, MA) can be used to make a “donut”-type pad for placement over convex prominences. The principle is to place the hole of the donut over the prominence so the surrounding padding absorbs the pressure, and there is pressure relief over the prominence. Several layers of cast padding are folded on each other; thus, making a pad approximately 3 inches by 3 inches. The pad is folded over on itself and a slit is cut in its center with bandage scissors. After opening the pad, digital tension is used to enlarge the slit to a round opening (“donut” hole). The pad is then placed over the prominence with the hole over the prominence. Secondary and tertiary bandage wraps hold the pad in place (Figure 2-5A-D). These bandages are effective over prominences on the lower limbs, (e.g. lateral/medial malleolus, calcaneal tuberosity, carpal pad). A variant of the “donut” bandage principle has been employed to relieve pressure on the paw pads. This technique uses medium density open-cell foam of a special type used in aircraft seat padding (ConforTM Foam, HiTech Foams, Lincoln NE). Two configurations have proven effective to relieve pressure on a metacarpal or metatarsal pad: an oblong piece of foam is cut to cover the entire palmar or plantar paw surface and a hole is cut in it in the area over the metatarsal or metacarpal wound; the foam is then incorporated into the bandage. For pressure relief over digital pad wounds, a triangular piece of foam is placed directly over the metacarpal or metatarsal pad and incorporated into the bandage, thus helping to elevate the digits and relieve pressure. A metal paw pad cup (cup end of a mason metasplint) can be placed over the bandage with either of these configurations for further help with pressure relief. This type of pressure relieving bandage is indicated for moderate pad wounds on small to medium sized dogs.


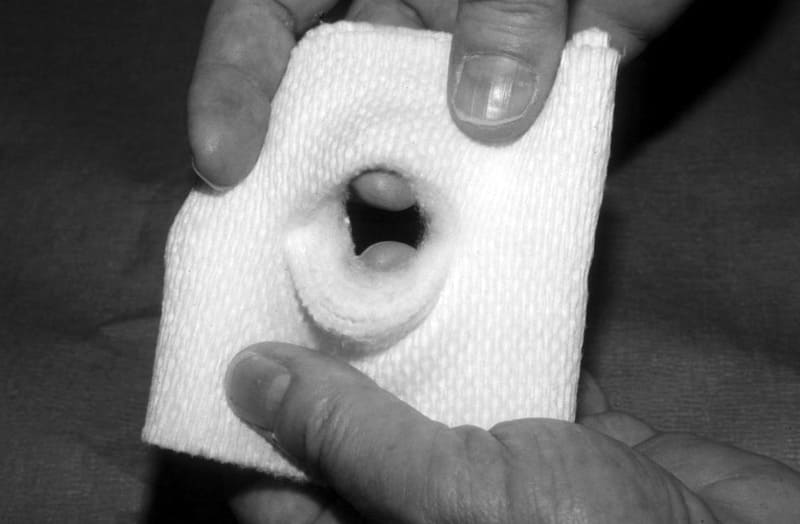

Figure 2-5. A.-D. Donut bandage. A. Folding several layers of cast padding to make a pad. B. Scissors cutting a slit in folded-over pad. C. Fingers enlarging the slit to a round hole. D. Pad placed over the calcaneal tuberosity to be held in place with secondary bandage wrap.
Immobilization and extension are important to enhance wound healing over the olecranon. Immobilization allows tissues to heal together and extension prevents elbow flexion to prevent sternal recumbency and thus keeps pressure off of the wound. Several techniques have been used to bandage elbow wounds.
Pipe insulation bandages can be used for wounds over the olecranon. They are made by splitting two pieces of foam rubber pipe insulation lengthwise, cutting a hole large enough to go around the lesion in each piece, and then stacking and taping the pieces together. The cranial aspect of the humeroradial area is well padded with cast padding before taping the pipe insulation bandage in place with the hole over the olecranon. Such padding helps to keep the dog from flexing the joint to position itself in sternal recumbency to place pressure on the olecranon area. It may be difficult to secure the bandage to keep it from slipping distally on the limb, especially on an obese dog that has a short segment of limb proximal to the elbow to which the bandage can be affixed. Affixing the pipe insulation bandage to a body bandage may be necessary to hold the pipe insulation bandage in place: a body bandage is placed just caudal to the forelimbs. A strip of 2 inch adhesive tape is placed, adhesive side down, on this bandage from the dorsal area well down onto the forelimb. The roll of tape is left on the strip. The padding and pipe insulation bandage are placed and taped over the elbow area. The previously placed strip of adhesive tape is twisted 180° at the base of this bandage so the adhesive side faces outward. The tape is then placed adhesive side against the bandage and is taken back onto the body bandage over the animal’s dorsum. This forms a “stirrup” to hold the pipe insulation bandage in place (Figure 2-6). No pressure is on the wound, and medications can be applied to the wound through the holes in the pipe insulation. The bandage and padding remain in place for several days before adjustment or replacement are necessary. The only daily bandage change necessary is a small amount over the wound.

Figure 2-6. A. Steps for putting on a pipe insulation bandage: 1) place a body bandage behind the front limbs; 2) transfer tape from the body bandage onto the limb; 3) split two pieces of pipe insulation; 4) cut holes in the pipe insulation to go over the elbow ulcer and stack the pipe insulation; 5) tape the pipe insulations together and place them over the olecranon wound; 6) put cast padding in front of the elbow area. B. Tape the pipe insulation and padding in place. Twist the tape (180°) on the limb (arrow) so the adhesive side is back against the bandage. C. Complete the tape stirrup back onto the body bandage.
Splints may also be used on the cranial surface of the forelimb to immobilize the elbow joint in extension and to prevent pressure on wounds over the olecranon. A routine bandage wrap is placed around the elbow; then a section of aluminum splint rod is used to fashion a loop type splint, which is incorporated into the cranial part of the bandage (Figure. 2-7).
The authors have also been able to keep elbows extended and immobilized by placing a body bandage on the dog with extension of the bandage down the length of the leg, i.e., a forelimb spica-type bandage. The leg bandage has some bulk to it. After placing the bandage, fiberglass casting tape (Delta-Lite “S” Fiberglass Casting Tape, Johnson & Johnson, Raynham, MA) is used to create a lateral splint for the limb. The casting tape is layered along the lateral side of the bandage from the level of the paw to over the shoulders. Several layers of tape are used, especially on large dogs. The tape splint is molded by hand to the lateral surface of the bandage until it hardens. When taken away from the bandage, it has the shape of a shepherd’s crook or a question mark. This is taped to the lateral side of the bandage, around the limb and over the shoulder area. A hole is cut in the bandage over the olecranon, through which the wound is treated. Usually, the bandage and splint remain in place 5 to 7 days before adjustment or replacement are needed, and the wound is treated daily via the hole with a small bandage covering, following treatment.

Figure 2-7. Applying an aluminum rod loop type splint in the front of an elbow bandage.
Another application of splints to a special wound healing situation is the use of “clamshell” technique to relieve pressure from the palmar or plantar surface of lacerated pads, pad flaps or pad grafts. This technique is even more effective at relieving pad pressure than the “donut” technique mentioned above and may be particularly indicated for protection of pad surgical sites. After bandaging the foot in a standard padded bandage, (a “donut” of the ConforTM Foam mentioned previously can also be applied over the affected pad or pads), two Mason metasplints are applied, one on the dorsal and the other on the palmar or plantar aspect of the limb with the paw cups facing each other and extending about 2.5 cm beyond the limb. Bandaging tape, applied in a dovetail fashion, secures the splints to the bandage. The metasplints should extend proximally almost to the elbow or to the tarsus. The functional effect is to convert the dog’s ambulation to a “tiptoe” gait, like a ballet dancer, thereby relieving pressure from the pads. At the end of the splints, a final layer of duct tape or thick adhesive elastic bandaging material (Elastikon®, Johnson & Johnson, New Brunswick, NJ) helps protect the splints (and owners’ flooring!) from abrasion (Figure 2-8).
The pipe insulation bandage, splint rod loop bandage, and fiberglass splint bandages are also effective in keeping pressure off wounds on the sternum because they prevent elbow flexion and keep the animal out of sternal recumbency. A pressure relief bandage for wounds (i.e., decubital ulcers) over the ischiatic tuberosities is composed of a body bandage with padded aluminum splints taped to either side of the bandage. These splints extend behind the dog and prevent it from attaining a sitting posture to place pressure on the ischiatic area (Figure 2-9).


Figure 2-8. Clamshell bandage splint. A Mason metasplint on the dorsal and plantar surface of a pelvic limb bandage. Paw cups extend beyond the bandage about 2.5 cm and face each other.

Figure 2-9. Body bandage with a lateral fiberglass splint to keep pressure off the ischiatic area.
Mobilization Versus Immobilization
The decision whether a wound should be mobilized or immobilized during healing is often not clear, with advantages and disadvantages to both; wound location and type, and the stage of wound healing are important factors to consider in making the decision.
Maintaining mobility of wounds has been considered to minimize negative nitrogen balance of the tissues, to stimulate circulation, to help combat infection, and to allow movement that loosens adhesions. Mobility can also provide massage for better wound drainage and can prevent joint stiffness and osteoporosis.
Other arguments favor wound immobilization to enhance healing. An immobilizing bandage is needed for wounds with underlying orthopedic damage. In addition to providing orthopedic support, wound immobilization may allow better healing over the olecranon, and the calcaneal tuber. Immobilization may also increase tissue resistance to bacterial growth and decrease the probability of infection and its spread by the lymphatics and tissue planes. Other factors favoring immobilization include patient comfort and support of the tissues during collagen synthesis. Wound immobilization also helps to prevent the dislodgment of fragile clots, rupture of new capillaries, and disruption of new fibrin. In addition, immobilization prevents tension on repaired structures (e.g., muscle, tendons, and ligaments).
Pressure bandages help to immobilize wounds; casts and splints also immobilize wounded limbs. Casts should be applied so that swelling can be accommodated as well as controlled. Applying a cast, then splitting the cast longitudinally on both sides, removing and reapplying it (bivalving a cast) allows for swelling and makes dressing changes possible. Application of a half of the cast to the side of the limb opposite the wound can be used for immobilization. Such a half cast can act as a point of counterpressure when a pressure bandage is required. It can be applied so the dressing can be changed without affecting immobilization. Incorporating a Mason metasplint into a bandage placed on a lower limb is an example of this type of immobilization.
Wounds over extensor and flexor surfaces of joints benefit from immobilization during healing. Because flexion of a joint tends to pull wound edges apart on the extensor surface of the joint, immobilization is indicated for such wounds. Large wounds over flexion surfaces of joints can benefit from early reconstructive surgery to help prevent wound contracture leading to deformity and loss of function of the joint. When large wounds over flexion surfaces are to be allowed to heal as open wounds, joint immobilization in extension is particularly important to help prevent contracture deformity. Another specific area where wound immobilization is indicated is the axillary region. As the forelimb moves, shearing and tension forces in this area interfere with wound healing. Reconstructive surgery and immobilization in a Velpeau bandage are needed for wound healing.
Prolonged joint immobilization may lead to cartilage degeneration, pressure wounds, joint stiffness and disuse atriphy. Thus, when bandages are changed, the wound should be cared for and joints should be evaluated for problems.
Suggested Readings
- Anderson DM. Management of open wounds. In Williams J, Moores A, eds. BSAVA Manual of canine and feline wound management and reconstruction. 2nd ed. Quedgeley, Glouster, England: British Small Animal Veterinary Association, 2009: 37.
- Anderson DM, White RAS. Ischemic bandage injuries: A case series and review of the literature. Vet Surg 2000;29:488.
- Bojrab MJ. Wound management. Mod Vet Pract 1982;63:867.
- Bojrab MJ. A handbook on veterinary wound management. Ashland, OH: KenVet Prof Vet Co, 1994.
- Campbell BG. Dressings, bandages, and splints for wound management in dogs and cats. Vet Clin North Am 2006; 36: 759.
- Hedlund CS. Surgery of the integumentary system. In: Fossum TW, ed. Small Animal Surgery. 3rd ed. Philadelphia: Saunders Elsevier, 2007: 159.
- Lee AH, Swaim SF, McGuire JA. The effects of nonadherent bandage materials on the healing of open wounds in dogs. J Am Vet Med Assoc 1987;190:416.
- Lee AH, Swaim SF, Yang ST. The effects of petrolatum, polyethylene glycol, nitrofurazone and a hydroactive dressing on open wound healing. J Am Anim Hosp Assoc 1986;22:443.
- Lee WR, Tobias KM, Bemis DA, et. al. Invitro efficacy of a polyhexamethylene biguanide impregnated gauze dressing against bacterial found in veterinary patients. Vet Surg 2004;33:404.
- Mentz P, Cazzangia A, Serralta V, et. al. The effect of an antimicrobial gauze dressing impregnated with 0.2% polyhexamethylene biguanide as a barrier to prevent Pseudomonas aeruginosa wound invasion. Mansfield, MA: Kendall, Wound Care Research and Development, 2001.
- Miller CW. Bandages and drains. In: Slatter DH, ed. Textbook of small animal surgery. 3rd ed. Philadelphia: Saunders Elsevier, 2003: 244.
- Morgan PW, Binnington AG, Miller CW, et al. The effect of occlusive and semiocclusive dressings on the healing of full thickness skin wounds on the forelimbs of dogs. Vet Surg 1995;23:494.
- Pavletic MM. Atlas of small animal reconstructive surgery. 3rd ed. Philadelphia: Saunders Elsevier, 2010.
- Ramsey DT, Pope ER, Wagner Mann C, et al. Effects of three occlusive dressing materials on healing of full thickness skin wounds in dogs. Am J Vet Res 1995;56:7.
- Swaim SF. The effects of dressings and bandages on wound healing. Semin Vet Med Surg Sm Anim 1989;4:274.
- Swaim SF. Bandages and topical agents. Vet Clin North Am 1990;20:47.
- Swaim SF. Bandaging techniques. In: Bistner SI, Ford RB, eds. Handbook of veterinary procedures and emergency treatment. 7th ed. Philadelphia: WB Saunders, 2000.
- Swaim SF, Bohling MW. Bandaging and splinting canine elbow wounds. NAVC Clinician’s Brief, 3(11):73-76, 2005
- Swaim SF, Henderson RA. Small animal wound management. 2nd ed. Baltimore: Williams & Wilkins, 1997.
- Swaim SF, Marghitu DB, Rumph PF, et. al. Effects of bandage configuration on paw pad pressure in dogs: A preliminary study. J Am Anim Hosp Assoc, 2003;39:209-216.
- Swaim SF, Renberg WC, Shike KM. Small animal bandaging, casting, and splinting techniques. Ames, IA: Wiley-Blackwell, (in press).
Wound Drainage Techniques
Mark W. Bohling and Steven F. Swaim
Indications
Although wounds drain best when left open, often they must be closed before they have drained completely. In general, wounds must be drained 1) when an abscess cavity exists, 2) when foreign material or tissue of questionable viability that cannot be excised is present, 3) when massive contamination is inevitable (e.g., wounds in the anal area), and 4) when it is necessary to obliterate dead space to prevent the accumulation of air, blood, serum or exudate, or to permit the egress of air or fluid accumulations from an existing cavity or wound. Specifically, wound drainage in veterinary surgery is used in the management of dog bite wounds with separation of the dermis from underlying tissue, abcessed cat bite wounds, lacerations with loose skin, radical mastectomy and other large excisional wounds, seromas, auricular hematomas, elbow and ischial hygromas, and certain instances of orthopedic trauma such as high energy fractures with extensive soft tissue trauma and swelling.
Types of Drains and Drain Techniques
Materials used for wound drains should be relatively soft, nonreactive, and radiopaque. Flat drains such as Penrose drains are made of soft, thin latex rubber material shaped cylindrically. Tube drains are composed of rubber or plastic tubes or catheters with thicker walls that are not as easily collapsed as flat drains. Multilumen drains are a combination of drain tubes that allow fluid to drain from a wound through one lumen while allowing air or lavage fluids to enter the wound by another lumen.
Drains are classifled as passive or active. Passive drains can be single lumen flat drains, tubular drains, or multilumen drains. These drains function by pressure differentials, overflow, and gravity. Active wound drainage occurs when an external vacuum is applied to the end of a drain tube. Active drains may or may not be open to the atmosphere.
Passive Drains
Flat Drains (Penrose Drains)
Penrose drains are thin walled rubber tubes available from 1/4 to 2 inches in diameter and from 12 to 36 inches in length. The mechanical action of these drains depends on capillary action and gravity because they provide a path of least resistance to the outside. Fenestrating a drain is not advised because drainage is related to surface area and fenestrating the drain reduces the surface area. Penrose drains allow egress of foreign material from the wound. Dead space is obliterated as fluid is drained and normal healing tissue fills the potential space.
Penrose drains are easily sterilized, are readily available, and cause little foreign body reaction. However, the latex causes the earlier formation of a fibrous tract in the tissue, a property that makes it good for draining abscesses because this tract between the abscess cavity and the skin is desirable for better drainage. Because they are soft and flexible, these drains do not exert undue pressure on adjacent blood vessels or other structures.
Single-Exit Drains
Penrose drains can be placed with one end of the drain emerging at the distal aspect of the wound. In preparation for placing such a drain, the hair around the area where the drain will exit should be clipped liberally. The length of drain placed in a wound should be recorded for comparison with the length that is removed. The dorsal end of the drain should be positioned before wound closure, slightly dorsal and lateral to the most dorsal aspect of the wound. The preferred technique for fixing the drain in the dorsal aspect of the wound is to pass a nonabsorbable suture through the skin and the drain and to tie it outside the skin. Only a very small bite is taken in the end of the drain; in the event that the patient removes the drain prematurely, a small suture bite in the drain minimizes the chance that a piece of the proximal portion of the drain will be torn off and remain in the wound. This suture is removed before the drain is removed (Figure 2-10).

Figure 2-10. Tacking a drain in the proximal aspect of a wound. A. The drain is placed off to one side of the wound, and a simple interrupted anchor suture is placed through skin, drain, and skin again. B. The wound is closed and the anchor suture is tied. C. When the drain is removed, the anchor suture is cut and the drain is pulled out.
When the drain is placed in the wound, it should run as vertically as possible, and placement next to large vessels should be avoided. A drain should never emerge through the end of the suture line; instead, an incision is made in the skin ventral and lateral to the ventral aspect of the wound. A pair of hemostatic forceps can be used to make a tunnel just under the skin for the drain to exit at this incision (Figure 2-11). The exit incision should be large enough to allow drainage around the drain, usually one and one half to two times the width of the drain. A tacking suture placed through the drain and skin where the drain emerges further secures the drain and prevents it from retracting into the wound (Figure 2-12). As the wound is closed, contact between the drain and the skin suture line should be strictly avoided; this can be accomplished by suturing subcutaneous tissue over the drain and by directing the drain so it does not lie under the suture line. Failure to follow this principle invites suture line dehiscence and/or inadvertent incorporation of the drain into the closure. Care should be taken to avoid incorporating the drain into any sutures as they are placed. If the drain is incorporated into a skin suture, it cannot be removed until the skin sutures are removed. If a drain is incorporated into a subcutaneous suture, its removal usually requires at least a partial re-opening of the wound.

Figure 2-11. Making a subcutaneous tunnel at the distal end of the wound with the tips of forceps. A scapel blade is used to incise the skin over the forceps tips to create a drain emergence site.

Figure 2-12. Placing and anchoring a drain distally. The drain exits through a hole distal to the wound. The exit hole is large enough to allow drainage around the drain. A simple interrupted nonabsorbable suture is placed through the skin and drain at the drain’s exit hole.
To prevent drain incorporation in the suture line, the drain is placed in the wound via the ventral drain hole. The dorsal end of the drain is placed at the appropriate location in the wound. The point at which the drain exits through the ventral drain hole is marked on the drain. The drain is then pulled from the dorsal end of the wound. This pulls the mark on the ventral part of the drain into the wound. The subcutaneous tissue is now apposed over the drain. Every 2 or 3 suture bites, both ends of the drain are grasped, and the drain is pulled back and forth to be sure no suture bite has incorporated the drain. Lack of free drain movement indicates drain incorporation in a suture, and 2 to 3 sutures can be removed and replaced. After all subcutaneous sutures are placed and the drain moves freely, the ventral end is pulled so that the dorsal end is now within the wound, and a deep simple interrupted suture through the skin, drain, and skin again is used to anchor the dorsal end of the drain. The previously placed mark on the drain is again at the level of the ventral drain hole. The skin can now be closed without concern for incorporating the drain because it is protected beneath the subcutaneous tissue. The ventral drain anchor suture is then placed.
When a closed wound (e.g., an unruptured abscess) requires drainage, an instrument with long jaws, such as a Doyen intestinal forceps, can be used to place one end of the drain in the depths of the wound through a stab incision near the dependent aspect of the wound. The tip of the forceps is used as a palpable landmark to pass a simple interrupted suture through the skin, into the drain, and back out through the skin. The suture is tied to anchor the drain in the dorsal aspect of the wound.
Penrose drains can also be used to drain deep wounds; however, care should be taken that an adequate pathway is created from the deep pocket to the skin surface to provide drainage. An open approach is usually made to the deep wound to allow debridement, lavage, culture, and biopsy. Apposition of the tissues overlying the deep pocket is usually sufficient to hold the drain in place. The usual principles of exiting the drain in a position that is dependent to the wound, and not within the primary closure, are followed.
Drains should be covered with sterile absorbent dressings to absorb wound fluid and prevent external contamination. Bandages also help to prevent molestation of the wound by the patient. The bandage should be changed frequently to remove fluid from the wound area. The area around the exit drain should be cleaned at bandage change; antiseptic ointments or creams are sometimes applied to the skin at the drain exit site to protect the skin from irritation from the draining exudate. In these cases, the ointment or cream should not be applied too thickly around the drain exit, or drainage may be obstructed. Inspection of the bandage reveals the nature and amount of drainage, to determine how long a drain should remain in place.
Double-Exit Drains
Penrose drains can also be placed with one end emerging above the dorsal aspect of the wound and the other end emerging below the ventral end of the wound. Simple interrupted sutures are placed through the skin and drain at both points of emergence to prevent the drains from retracting into the wound (Figure 2-13). The use of double exit drains remains somewhat controversial; many surgeons avoid the use of vertically oriented double exit drains, asserting that the double exit holes increase the risk of ascending bacterial infection. However, there is no support for this hypothesis in the scientific data, whether based on experimentation or patient statistics. Double exit drains can be advantageous if the wound is to be flushed with an antibiotic or antiseptic. They are usually used in heavily contaminated or infected wounds. Lavaging the wound from the proximal tube emergence site exposes the wound tract to the solution, although the lavage solution may merely follow the path of least resistance, the drain tract, and not reach the crevices of the wound. Moreover, if pressure is applied to the lavage solution or if the distal drain opening is occluded, the lavage solution can spread wound debris and bacteria into surrounding tissue by hydrostatic pressure.
Another use for double exit drains is when considerable subcutaneous dead space extends up the lateral trunk, across the dorsum, and down the opposite lateral trunk. A drain can be placed from the most dependent area of dead space on one side, across the dorsum of the animal to a like area on the opposite side. Thus, the drain passes subcutaneously across the animal’s back with an exit on each side to provide drainage.

Figure 2-13. A drain can exit at both proximal and distal aspects of a wound. The drain is anchored to the skin at both exit holes. (From Swaim SF. Surgery of traumatized skin: management and reconstruction in the dog and cat. Philadelphia: WB Saunders, 1980:159.)
Tube Drains
Rubber or plastic tubes and catheters of various diameters and designs can be used as tube drains. These cylindrical tubes have a thicker wall than flat drains. They have a single lumen with or without small or large side holes. Additional side holes, if desired, should be cut in an oval and should be no more than one third the diameter of the drain, to prevent kinking and possible tearing of the drain. The basic mechanism of action and the principles of application of tube drains are the same as for flat drains.
Fenestrated tube drains can drain from both inside and outside the lumen, and they can be connected to a suction apparatus for use with a closed collection system. These tubes also allow irrigation through the drain. They are not expensive and they are readily available. Silicone plastic (silastic) tube drains may cause less tissue reaction than rubber tube drains. One disadvantage of tube drains is that their stiffness can cause patient discomfort. These drains may become obstructed by clots and debris, necessitating flushing to clear them.
Active Drains
Open Suction Drains
When a vacuum is applied to one lumen of a multilumen drain, fluid is removed from the wound as air enters the wound through another drain lumen as a sump drain. Although the procedure reduces the drainage time, we do not use it because the increased volume of environmental air drawn into the wound increases the chance of bacterial infection and can be traumatic to the tissues. Bacterial filters can be fitted to the air intake to help decrease contamination.
Closed Suction Drains
Closed suction drainage occurs when suction is applied to a drain tube that has been placed into a wound with no external air venting. This implies not only a single, airtight exit site for the drain, but in addition, an airtight wound (either a natural blind pocket or surgical airtight closure) allowing the creation of a vacuum within the wound. This drainage system facilitates continuous flow and reduces the chance of drainage tube occlusion and the need for wound irrigation. Closed suction drains do not depend on capillary action or gravity. Closed suction drains have the same indications as passive drains; however, they work best when no foreign material or necrotic tissue is present, because these could plug the drain holes.
Numerous commercial portable closed suction drainage systems are available. When incorporated into a bandage, these drains provide portable, continuous, even pressure, and aseptic closed suction drainage. In some of these systems, unless a one way valve device is included, fluid may reflux back into the wound if the animal lies on or puts pressure on the evacuator. The location of the wound, the size of the animal, and the size of the commercial apparatus should be considered when choosing a commercial closed suction system; one model in common use (Jackson-Pratt®, Allegiance, a Cardinal Health company, McGaw Park, IL) employs a clear silastic 100 ml bulb-type reservoir with one-way valve. This is attached to a 25 cm length of 3 x 10 mm, multi-fenestrated drain by a 30” silastic tube. The drain and tube can be trimmed to the desired length, and the suction reservoir can be conveniently stored in a pocket that is constructed in the animal’s bandage.
An inexpensive and simple closed suction drainage system can be made using a butterfly scalp needle with its extension tube as the drainage tube, and a 5 or 10 mL evacuated blood collection tube to provide suction. The Luer syringe adapter of the butterfly scalp needle is cut off the tubing and discarded, leaving the needle and attached tubing intact. A scissor is used to cut small (1-2 mm) oval holes into the tubing, extending for a length a little shorter than the length of the wound (Figure 2-14). The fenestrated portion of the tube is inserted through a small puncture wound near the site to be drained. The puncture wound should be the same diameter as the tube. The tubing is secured to the skin with a nonabsorbable pursestring suture. After the wound is closed, the needle on the free end of the tube is inserted into a standard 5 or 10 mL evacuated blood collection tube (Figure 2-15). A light bandage into which the collection tube is incorporated is usually all that is necessary. For large wounds, two drain sets may be necessary.
If the drain is placed under a (non-fenestrated) skin graft, the end of the drain should be placed under the skin at the edge of the graft. A simple interrupted tacking suture is placed through the skin, through the tube, and back out through the skin to anchor the end of the drain. This suture, along with the pursestring suture at the drain exit hole, secures the drain under the graft so it does not move to interfere with graft revascularization (Figure 2-16).
A modification of this closed suction apparatus involves the use of plastic syringes. To prepare the drain tube, the butterfly needle is removed from the scalp set, leaving the Luer adapter attached to the tubing, and the tubing is fenestrated. (Figure 2-17A). After the tubing has been placed in the wound and the wound has been closed, a plastic syringe is attached to the Luer adapter. The plunger is withdrawn enough to create the desired negative pressure without collapsing the drain tubing, and a 16 or 18 gauge needle is driven crosswise through the syringe plunger just above the syringe barrel to hold the plunger at the desired level within the barrel (Figure 2-17B). Fixation at different levels creates different negative pressures. The size of syringe that is used corresponds to the expected volume of fluid to be drained; a 6 ml syringe can be used when little drainage is anticipated, while a 30 mL syringe can be used when large amounts of fluid are to be removed.

Figure 2-14. Components of a simple closed suction drain. A. A 19 gauge butterfly catheter after multiple fenestrations have been made in the tubing. B. Luer adapter that was removed from the catheter. C. A 10 mL evacuated glass tube.
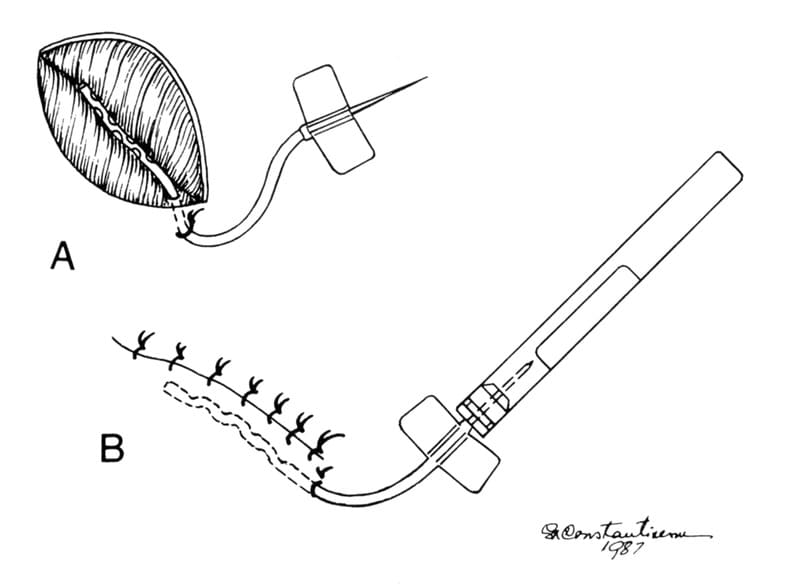
Figure 2-15. Placement of a closed suction drain in a wound. A. The fenestrated portion of the drain is inserted into the wound through a small opening near the distal end of the wound. The tube is secured to the skin with a simple interrupted nonabsorbable suture. B. The wound is closed. The needle on the tube is inserted into a 5 or 10 mL evacuated blood collection tube.
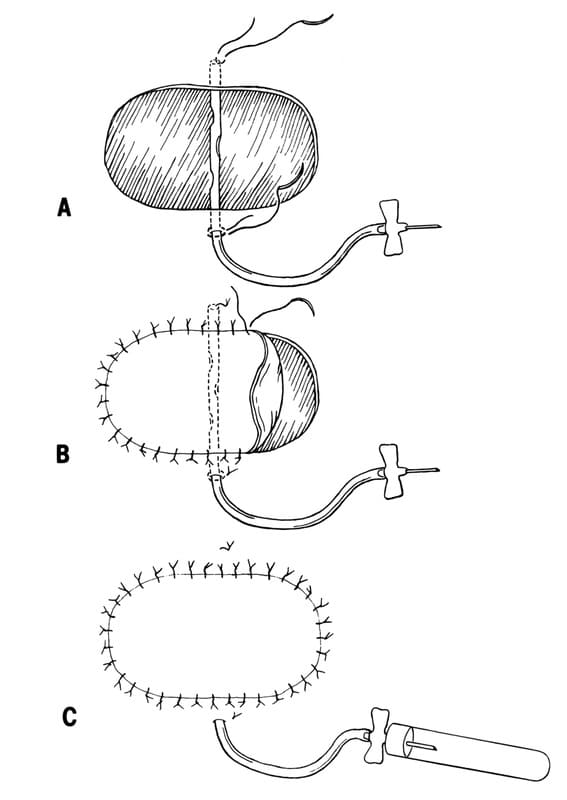
Figure 2-16. Placement of a closed suction drain under a skin graft.
A. A butterfly catheter with the Luer adapter removed and the tubing fenestrated is placed across the wound bed before the graft is placed. The proximal end is secured with a simple interrupted suture placed through skin, catheter, and skin again. A pursestring suture is used to secure the distal end of the tubing to the skin. B. The graft is sutured into place over the drain. C. The needle on the catheter is inserted into a 5 or 10 mL evacuated blood collection tube. (From Swaim SF. Skin grafts. Vet Clin North Am Small Anim Pract 1990;20:147.)

Figure 2-17. Modified closed suction drain. A. The butterfly needle is removed from the catheter and the catheter tubing is fenestrated. The Luer adapter is left on the catheter. B. A plastic syringe is attached to the Luer adapter of the catheter. A metal pin or hypodermic needle is driven through the plunger just above the barrel after the plunger is withdrawn the desired distance. The end of the plunger can be cut off.
Closed suction drains allow wounds and dressings to be kept dry: they help to prevent bacterial migration through or around the drain; they provide continuous drainage to decrease drainage time; they reduce the need for irrigation; and they have few complications. When used under skin grafts, these drains help to hold the graft in contact with the wound bed, enhancing revascularization and early engraftment. Evacuated blood collection tubes can be changed as often as necessary, and wound fluid can be accurately measured and cytologically examined to assess wound infection.
One disadvantage of closed suction drainage is that high negative pressure can injure the tissue. In addition, although the 10 mL evacuated blood tubes are effective and not cumbersome to incorporate into a bandage, they may need to be changed several times each day in highly productive wounds.
Duration of Drainage
The times for drain removal vary depending on the type of wound drained. A drain should be removed as soon as the need for it no longer exists. The amount and character of drainage fluid are the most important factors in determining when a drain should be removed. In general, it is time to remove the drain when the amount of drainage is significantly decreased (usually by half or more) and is remaining relatively constant from day to day, and the character of drainage fluid becomes less turbid, becoming serous or serosanguinous. Closed suction drains incorporate fluid storage within the system, simplifying evaluation of volume and character. When a passive drain is employed, absorbent bandage material should be placed over the drain to protect the wound and the drain, and to capture the drainage for evaluation of volume and character. To give some specific examples of approximate duration of drainage, a drain placed in a wound to prevent hematoma formation from capillary oozing can be removed within 24 hours. A drain used for an infection, such as an abscess, should be removed in 3 to 5 days or when the infection is controlled. For hygromas and large seromas, the drain may need to remain in place for as long as 10 to 14 days, for severe bite wounds, 4 to 6 days; and for major tumor resection with creation of extensive dead space, 4 days.
Complications and Failures of Drains
Failure to secure a drain to the skin or to protect it from molestation can result in removal of a drain before it has accomplished its purpose, slippage back into the wound, or breaking off in the wound. If strong adhesions form around a drain or if a suture has inadvertently been passed through the drain, the drain may break when being removed, leaving a portion in the wound. Use of drains can cause wound infection because of decreased local tissue resistance and infection ascending around the drain with bacterial proliferation in the area. Proper aseptic technique should always be followed whenever drain management is performed (e.g. emptying the reservoir of a closed suction drain) to minimize the risk of this complication. Drains placed in some areas (e.g., axillary or inguinal areas) may allow air to be sucked into the wound as tissues move. This can result in subcutaneous emphysema. Surgeons should not rely on drains rather than good surgical technique to manage wounds, nor should they give in to the temptation to close and drain areas that would be better left open.
Suggested Readings
- Fox JW, Golden GT. The use of drains in subcutaneous surgical procedures. Am J Surg 1976;132:673.
- Hak DJ: Retained broken wound drains: A preventable complication. J Orthop Trauma 2000;14:212.
- Hampel NL. Surgical drains. In: Harari J, ed. Surgical complications and wound healing in the small animal practice. Philadelphia: WB Saunders, 1993.
- Hampel NL, Johnson RG. Principles of surgical drains and drainage. J Am Anim Hosp Assoc 1985;21:21.
- Ladlow J. Surgical drains in wound management and reconstructive surgery. In: Williams J and Moores A, eds. BSAVA Manual of Canine and Feline Wound Management and Reconstruction, 2nd ed. Quedgeley, Gloucester, UK, BSAVA, 2009.
- Lee AH, Swaim SF, Henderson RA. Surgical drainage. Compend Contin Educ Pract Vet 1986;8:94.
- Moss JP. Historical and current perspectives on surgical drainage. Surg Gynecol Obstet 1981;152:517
- Pope ER, Swaim SF. Wound drainage from under full thickness skin grafts in dogs. Part 1. Quantitative evaluation of four techniques. Vet Surg 1986;15:65.
- Roush JK. Use and misuse of drains in surgical practice. Probl Vet Med 1990;2:482.
- Swaim SF. Surgery of traumatized skin: management and reconstruction in the dog and cat. Philadelphia: VVB Saunders, 1980:157 160.
- Swaim SF, Henderson RA. Small animal wound management. 2nd ed. Baltimore: Williams & Wilkins, 1997.
About
How to reference this publication (Harvard system)?
(2021) “Bandaging and Drainage Techniques”, Current Techniques in Small Animal Surgery (5th Edition). Available at: https://www.ivis.org/library/current-techniques-small-animal-surgery-5th-edition/bandaging-and-drainage-techniques (Accessed: 16 June 2024).
Author(s)

Copyright Statement
© All text and images in this publication are copyright protected and cannot be reproduced or copied in any way.Buy this book
Buy this book
This book and many other titles are available from Teton Newmedia, your premier source for Veterinary Medicine books. To better serve you, the Teton NewMedia titles are now also available through CRC Press. Teton NewMedia is committed to providing alternative, interactive content including print, CD-ROM, web-based applications and eBooks.

Teton NewMedia
PO Box 4833
Jackson, WY 83001
307.734.0441
Email: [email protected]
Comments (0)
Ask the author
0 comments